That said, this is not a weekend project. Building a screened-in deck with a roof from scratch spans two distinct construction phases — structural build and screen installation — each with its own tools, code requirements, and failure points. According to HomeAdvisor's 2025 cost guide, new screened-in porch construction runs $25–$120 per square foot, with costs climbing fast when a new roof and deck framing are included.
This guide covers everything: what to prepare before you break ground, a step-by-step construction walkthrough, the variables that most affect quality, and a clear-eyed look at when DIY makes sense versus when a licensed contractor is the right call.
Key Takeaways
- Expect two major phases: structural framing (deck + roof) and screen installation — the framing phase takes more time and skill than most homeowners anticipate
- Building permits are required in most jurisdictions; skipping them creates fines, stop-work orders, and resale complications
- Asphalt shingles require a minimum 2:12 roof pitch — flatter designs need metal roofing
- Choose screen fabric based on your climate — UV exposure, salt air, and pets all affect which material holds up
- Most homeowners hire a licensed contractor for the structural and roofing phases, even with prior building experience
What You Need Before You Start Building
Skipping the preparation phase is the single most common reason these projects fail, get cited by inspectors, or require expensive rework. What happens before the first footing hole is poured determines everything that follows.
Permits, Codes, and Site Checks
Most municipalities require a building permit for any new deck and roofed structure attached to a home. Contact your local building department early — not just to file paperwork, but to understand:
- Zoning setbacks from property lines and easements
- Height restrictions that affect roof design
- Structural drawing requirements (some jurisdictions require stamped engineering drawings)
- Frost line depth in your area, which dictates how deep footings must go per IRC R403.1.4
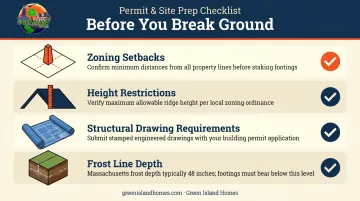
Before digging any footing holes, call 811 — the national call-before-you-dig service. The Common Ground Alliance reports that U.S. 811 centers handle more than 35 million utility locate requests annually. The call is free, and hitting an unmarked utility line is not a risk worth taking.
Beyond the general permit checklist, regional codes add requirements of their own. In coastal areas like Cape Cod and Martha's Vineyard, the Massachusetts 10th Edition State Building Code (780 CMR) applies ASCE 7 wind parameters to any attached roofed structure — and specifies salt-air-resistant hardware throughout.
Tools and Materials Overview
Primary tools:
- Post hole digger, circular saw, miter saw
- Drill, framing hammer, speed square
- Laser level, stapler, caulking gun, spline roller
Primary materials:
- Concrete tube forms and quick-set concrete
- Post bases (galvanized or stainless in coastal areas)
- Dimensional lumber: posts (6x6), joists, rafters, ledger boards
- 1/2-inch exterior-grade plywood sheathing
- Roofing shingles or metal panels, plus drip edge flashing
- Screen fabric (fiberglass or aluminum mesh)
- Screen framing components: base track, spline, caps, or 1x2 wood frames
- Exterior deck screws and structural hardware
How to Build a Screened-In Deck With Roof
Step 1: Plan Your Layout and Obtain Permits
Start by determining deck dimensions, roof pitch, and placement relative to the house. One practical planning note: screen panels typically come in 4-foot-wide sections, so space your posts and columns at 4-foot increments to avoid custom cuts on every bay.
Prepare a basic construction drawing showing:
- Deck footprint and post locations
- Roof framing direction and pitch
- Screen panel layout and door rough-in dimensions
Most building departments require this drawing to issue a permit. In Massachusetts coastal towns, your drawing will also need to cover wind exposure category and uplift connector requirements.
Identify your local frost line depth before finalizing footing dimensions — this varies significantly across the country and determines how deep each footer hole must go.
Step 2: Dig Footings and Set Posts
Dig footer holes below the frost line. Place concrete tube forms, check for plumb, pour quick-set concrete, and embed galvanized post base hardware while the concrete is still wet.
Once the concrete cures — typically 24–48 hours — attach 6x6 vertical support posts to the post bases. Verify plumb in both directions (front-to-back and side-to-side) before fully securing. An out-of-plumb post compounds errors through every framing step above it.
Step 3: Build the Deck Frame and Floor
Attach the ledger board to the house by removing a section of siding, drilling pilot holes into the structural rim joist, and securing with lag screws. Caulk every seam — water intrusion behind the ledger causes rot that often isn't visible until it's a major repair.
Install perimeter rim joists from the ledger to the outer beam, then add interior joists at 16 inches on-center using joist hangers. Check level before proceeding.
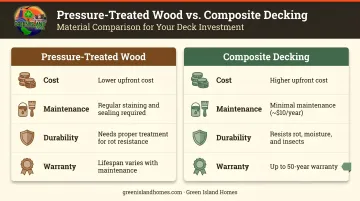
For decking material, two main options:
| Factor | Pressure-Treated Wood | Composite Decking |
|---|---|---|
| Upfront cost | Lower | Higher |
| Maintenance | Regular staining/sealing required | Minimal; Trex claims ~$10/year |
| Rot/moisture resistance | Needs proper treatment | Resists rot, moisture, insects |
| Lifespan/warranty | Varies with maintenance | Up to 50-year warranty (TimberTech) |
Leave a 1/8-inch gap between deck boards for drainage. If using composite decking with gaps, consider laying screen fabric over the joists before installing boards to block insect entry from below.
Step 4: Build the Roof Structure
Secure a second ledger board to the house wall at the correct height for your desired roof pitch — 9 feet above the finished deck surface is a common starting point. Fasten with lag screws and caulk all seams, then install rafter hangers along the ledger at 16 inches on-center.
A standard porch roof pitch of 1:6 (approximately 4 inches of drop per 24 inches of horizontal run) works for most designs. Calculate your rafter cut angles with a speed square before touching a saw.
From there, the roof frame assembly follows this sequence:
- Set outer roof support posts plumb
- Secure the header beam across the post tops
- Cut 2x6 rafters to the correct angle at each end
- Seat rafters into hangers at the house ledger and toenail to the beam at the outer edge
Important for coastal builds: Massachusetts coastal areas fall under ASCE 7 wind speed and exposure category requirements. Site-specific wind parameters determine whether uplift connectors or high-wind rafter hangers are required — check with your building department rather than assuming standard hangers are sufficient.
Step 5: Apply Roofing Materials
Nail 1/2-inch exterior-grade plywood sheathing across the rafters, then install roofing material:
- Asphalt shingles: Minimum 2:12 pitch per IRC and ARMA guidelines; pitches between 2:12 and 4:12 require a double layer of roof deck protection per GAF's low-slope installation requirements. Never install asphalt shingles below 2:12.
- Metal roofing: Standing seam can go as low as 0.25:12 (per MBCI specifications), making it the right choice for shallow-pitch porch roofs. It costs 2–3x more than asphalt upfront but lasts 30–50+ years versus 12–20 for asphalt.
Install drip flashing at the top where the roof meets the house siding — overlap flashing under the siding and over the shingles. Caulk every penetration point.
Step 6: Frame Screen Openings and Install Screens
Frame each screen bay using rot-resistant lumber (pressure-treated, cedar, or redwood). Install a floor cleat and ceiling cleat in each bay, perfectly plumb — these receive the screen panels. Frame door openings to the correct rough-in dimensions for your chosen door unit.
Always verify square by measuring diagonals. Both diagonal measurements must match before you finalize framing. Out-of-square bays produce screens that gap at corners and let insects through.
Two installation approaches:
- Screen Tight-style systems: Screw base track to all four sides of the opening, stretch screen fabric taut, roll spline into the groove, then snap decorative caps over the base to finish
- DIY wood frame systems: Build 1x2 frames sized to each opening, staple screen fabric across the face, bolt frames to floor and ceiling cleats with wing nuts for seasonal removal
Prime and paint all exposed wood trim before attaching fabric. Use hot-dipped galvanized or stainless steel fasteners throughout — standard zinc fasteners rust quickly in coastal salt air, leaving stains that are difficult to remove.
Key Variables That Affect Your Results
Roof Pitch and Drainage
A roof that's too flat lets water pool on the sheathing, accelerating rot and shingle failure. Confirm the minimum pitch required by both your shingle manufacturer and local building code before cutting a single rafter. This isn't something to eyeball — check it twice.
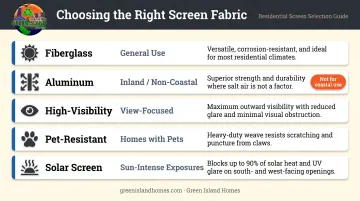
Screen Material Selection
Five main fabric types, each suited to different conditions:
- Fiberglass — affordable, dent-resistant, most common; Phifer's 18x14 mesh is 50% stronger than standard fiberglass insect screen
- Aluminum — stronger weave, but corrodes in salt-air environments; not suitable for coastal or island locations where salt air accelerates corrosion
- High-visibility — nearly invisible weave for unobstructed views (Phifer UltraVue 2)
- Pet-resistant — reinforced mesh for dogs and cats (Phifer PetScreen, Screen Tight Super Screen with 10-year warranty)
- Solar screen — blocks 80–90% of heat and glare (Phifer SunTex 80/90); ideal for sun-intense or south-facing exposures
Get physical samples before ordering — what reads as "charcoal" or "gray" in a product photo can look very different once it's framing your view.
Decking Material Choice
Screen material keeps the bugs out, but your decking choice determines how much upkeep follows. Pressure-treated wood costs less upfront but demands ongoing maintenance; composite costs more initially but largely takes care of itself. For a screened environment where moisture management matters, composite's resistance to rot and insects is worth the premium. See the full comparison table in Step 3.
Common Mistakes to Avoid
- Building without a permit: Consequences include fines, stop-work orders, and complications when selling. In Massachusetts, unpermitted work can trigger fines, mandatory tear-downs, and title issues at closing — the financial exposure varies by town but is rarely worth the shortcut.
- Wrong roof pitch or bad flashing: Cutting rafters at the wrong angle or skimping on flashing at the house connection creates leaks that rot the structure from the inside. Check pitch calculations twice before cutting.
- Out-of-square screen bays: Measure diagonals on every opening before finalizing framing. Gaps at corners mean bugs get in — and you're back to swatting mosquitoes.
- Screen material matters more than most people realize. Basic fiberglass degrades fast in high-UV climates, while aluminum corrodes quickly in salt air — a real concern for Cape Cod and Martha's Vineyard homeowners. Match the material to your environment before you buy.
When to Hire a Professional vs. DIY
The screen installation phase is often manageable for a handy DIYer. The structural deck framing and roof construction phases are a different story — they require accurate construction drawings, familiarity with local building codes, and structural carpentry skills where mistakes are expensive and sometimes dangerous.
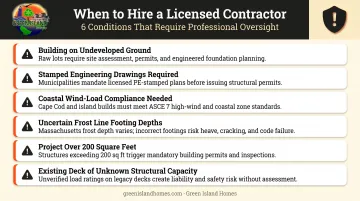
Conditions that indicate hiring a licensed contractor:
- Building on undeveloped ground from scratch
- Local code requires stamped engineering drawings
- Coastal wind-load compliance (especially relevant on Cape Cod and Martha's Vineyard)
- Any uncertainty about frost line footing depths
- Projects over 200 square feet
- Existing deck of unknown structural capacity needing a roof added
If any of those conditions apply to your project, working with a licensed contractor familiar with local codes is the right call.
For homeowners on Cape Cod and Martha's Vineyard, Green Island Homes is a fully licensed and insured residential construction contractor (HomeAdvisor Top Rated and Elite Service) that handles every phase — permits, footings, framing, roofing, and finish work.
In a coastal environment with specific wind and salt-air requirements, having one contractor manage the full scope means one point of contact from permits to punch list. Reach them at 774-563-9714 or sales@greenislandhomes.com.
Conclusion
A screened-in deck with a roof is one of the higher-value outdoor upgrades you can add to a home — more livable square footage, year-round usability, and real protection from the elements. The project earns that value by being genuinely complex: two distinct construction phases, local code compliance, precise pitch calculations, and material choices that carry long-term consequences.
The most preventable failures all come from the same places: no permit, wrong roof pitch, and materials that weren't chosen for the local climate. Getting those three things right puts you well ahead of most DIY attempts. And if the structural phases feel outside your wheelhouse, bringing in a licensed contractor — especially one familiar with your local building codes — is often the smarter call. For homeowners on Cape Cod or Martha's Vineyard, Green Island Homes handles deck construction and roofing under one roof, from permits through final inspection.
Frequently Asked Questions
How much does it cost to screen in a deck and add a roof?
Costs vary widely based on size, materials, and region. Angi's 2026 guide puts existing porch screening at $2,000–$4,000, while new screened-in porch construction runs $25–$120 per square foot according to HomeAdvisor. The roof structure and roofing material typically represent the largest share of the budget.
Do I need a building permit to build a screened-in deck with a roof?
Yes, in most jurisdictions. Any roofed structure attached to a home typically requires a permit, and skipping it can result in fines, stop-work orders, and complications when selling the property. Contact your local building department before breaking ground.
Can I add a screened-in roof to an existing deck?
Often yes, but the existing structure must first be evaluated to confirm footings, post sizing, and framing can handle the added roof load. This assessment requires a contractor inspection. Don't assume an older deck is automatically adequate.
What is the best roofing material for a screened-in deck?
Asphalt shingles are the most cost-effective option but require a minimum 2:12 roof pitch. Metal roofing handles lower pitches (standing seam can go to 0.25:12), lasts significantly longer, and performs better in coastal or high-rain environments. For coastal climates like Cape Cod, the higher upfront cost is usually justified.
What type of screen material is best for a screened-in porch?
Fiberglass is the most popular all-purpose choice. Aluminum offers added durability but corrodes in salt air, so it's a poor fit near the coast. Pet-resistant mesh suits households with dogs or cats, while solar screen (such as Phifer SunTex 80/90) blocks 80–90% of heat and glare on sun-exposed west- or south-facing porches.
How long does it take to build a screened-in deck with a roof?
An experienced crew typically completes a full build in 2–4 weeks, but permitting, concrete curing, and weather delays extend that timeline. DIYers working weekends should expect considerably longer.