The catch is that multi-level construction involves decisions that affect safety and permit approval before a single board goes up. Which framing approach — freestanding or connected? Which beam type — drop or flush? How will the height transition between levels get handled without violating step-rise requirements? Get any of these wrong and you're either reworking the frame or failing inspection.
This guide walks through every major decision, from pre-build planning through transition step installation, with code-accurate detail throughout.
Key Takeaways
- Plan your framing connection type (freestanding vs. connected) and beam type (drop vs. flush) before purchasing materials
- Frame each deck level independently, then connect or transition using properly sized joists, beams, and rated hardware
- Use a transition box step when the height gap between levels exceeds a single code-compliant rise
- IRC 2021 R311.7 sets the maximum riser height at 7¾ inches, with no more than ⅜ inch variation between steps in a flight
- Permits are required in most municipalities — confirm local requirements before breaking ground
Is a Multi-Level Deck Right for Your Property?
Multi-level decks shine in specific situations. They're the right choice when:
- The yard is sloped — building at multiple grades beats burying a single level in fill or suspending it awkwardly on tall posts
- Distinct zones are needed — separate levels naturally divide cooking from dining from lounging without requiring fencing or partitions
- Visual interest matters — a tiered structure adds architectural dimension that a flat platform can't match
They're not always the right answer. On a flat, compact lot, the added framing complexity increases cost without delivering usable benefit. Tight budgets or very small footprints often get more value from a well-built single-level deck.
Coastal Considerations on Cape Cod and Martha's Vineyard
Building near the water adds structural complexity that inland projects don't face. Key factors in Barnstable and Dukes counties include:
- Erodible coastal soils that affect footing sizing and bearing capacity
- A 48-inch frost line under Massachusetts 780 CMR — deeper than most inland states
- Salt air exposure reaching up to 10 miles from the ocean, which changes connector and fastener requirements — standard galvanized hardware often isn't adequate
For homeowners on the Cape or the Vineyard, a licensed local contractor like Green Island Homes (Edgartown, MA) brings familiarity with these specific site conditions and regional code requirements built into every project.
What You Need Before You Start Building
Getting organized before you break ground saves time, money, and headaches mid-build. Here's what to have ready before you touch a single board.
Tools and Materials
Essential tools:
- Drill, circular saw, hammer
- Measuring tape, framing square, speed square
- Post-hole digger or auger
- Level (4-foot minimum)
Core structural materials:
- Pressure-treated lumber for all framing members
- Concrete for footings
- Joist hangers (sized to match joist dimensions)
- Angle brackets and L-bracket connectors (such as Simpson Strong-Tie L70Z)
- Strong-Drive SDWS framing screws (3-inch, code-listed under 2018/2021 IRC)
- Eye protection, gloves, and reinforced footwear
Permits and Plans
With your materials list in hand, the next step is permits — and this isn't one to skip. A deck permit is required in nearly all municipalities. Per IRC R105.2, the exemption only applies to decks that are 200 sq. ft. or less, 30 inches or less above grade, not attached to a dwelling, and not serving the required exit door — multi-level decks rarely meet all four conditions.
Your permit submittal will typically need:
- Deck footprint and height dimensions
- Beam and joist layout with member sizes
- Footing depth and diameter
- Stair and railing specifications
Reach out to your local building department before purchasing materials — once framing starts, changes get expensive.
Safety and Pre-Build Checks
Permits approved, materials sourced — before framing begins, run through these on-site checks:
- Confirm footing depth meets or exceeds local frost depth (48 inches in Massachusetts)
- Verify soil stability — shifting or erodible soils may require wider footings or a helical pier system
- Have all PPE on hand before framing begins
How to Build and Frame a Multi-Level Deck: Step by Step
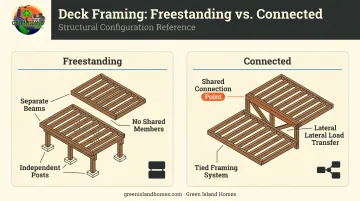
Step 1: Decide Between Freestanding or Connected Framing
This decision shapes everything that follows. Each approach has distinct structural implications:
- Freestanding: Each level has its own posts, beams, and frame — structurally independent. Levels can be built one at a time, which allows phased construction, but each level needs a complete structural system.
- Connected: Adjacent frames are physically tied together, transferring lateral loads between levels for improved rigidity. Requires more coordination upfront and strict attention to fastening, flashing, and lateral-load details. Worth noting: approximately 90% of deck collapses involve failed ledger connections.
Your local building code may require one approach over the other — check with your AHJ (Authority Having Jurisdiction) before committing. Either way, all levels must be squared and aligned before framing proceeds.
Step 2: Choose Your Beam Type and Set Posts
| Beam Type | Best For | Trade-off |
|---|---|---|
| Drop beam (sits below joists) | Sites with sufficient vertical clearance | Adds height; easier to build and inspect |
| Flush beam (tops level with joists) | Low-clearance decks near grade | Keeps profile lower; requires precise installation |
The wrong choice creates real problems. A flush beam in the wrong application is difficult to waterproof and access for maintenance. A drop beam too close to grade traps moisture and deteriorates faster.
Setting posts:
- Dig footings to the required depth — at minimum, below your local frost line
- Pour concrete and set post bases or embed posts per local code
- Plumb each post vertically and brace it before attaching beams
- Space posts using AWC DCA6 span tables for your specific lumber species, beam size, and joist span — the right number varies by application
AWC DCA6 specifies 6×6 nominal posts in prescriptive deck details. Angle brackets keep joists flush with beam tops during joist hanger installation regardless of beam type.
Step 3: Install Joists for Each Deck Level
Start with the rim joists (the outer perimeter boards) to establish the frame boundary of each level, then work inward.
Joist installation sequence:
- Install all four rim joists and check for square using the 3-4-5 rule (measure 3 feet along one side, 4 feet along the perpendicular side — if the diagonal is exactly 5 feet, the corner is 90 degrees; use 6-8-10 or 9-12-15 multiples for larger frames)
- Install interior joists at the required on-center spacing — typically 12" or 16" OC depending on species, size, and decking material weight
- Secure each interior joist with a properly sized metal hanger at both ends, nailed or screwed into the rim joist or ledger board
Each level must be checked for square before joists are fully fastened. An out-of-square frame causes cascading alignment problems with decking boards, stairs, and railing posts that are much harder to fix.
Step 4: Frame and Attach the Transition Box Step
A transition box step is a small framed platform placed between two deck levels. It exists because a single step from one level to the next would often exceed the maximum allowable rise under IRC R311.7 (7¾ inches maximum, ⅜ inch maximum variation between steps in a flight).
Two installation sequences:
| Sequence | Requirement |
|---|---|
| Before decking | Blocking required at all deck board ends |
| After decking | Support blocking required below box step, no deck-end blocking needed |
Both methods require support blocking beneath the box step.
Attachment sequence:
- Measure total height between levels and divide evenly to determine the number of steps needed
- Secure the box step to the upper frame using structural screws
- Verify the height split is even across all steps (within ⅜ inch)
- Attach L-brackets (such as L70Z) at each end and at center to the lower deck surface
- For larger height transitions, use multiple box steps or stair stringers
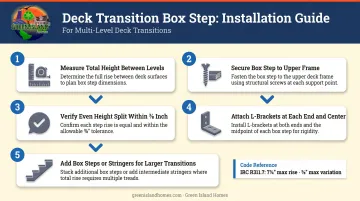
Get your step count right before cutting — inconsistent rise heights are one of the most common reasons multi-level decks fail inspection.
Key Factors That Affect Multi-Level Deck Framing
Four factors drive the structural logic of a multi-level deck frame. Getting any one of them wrong leads to failed inspections, instability, or expensive rework.
Framing Connection Type
Connected framing transfers lateral loads between levels, adding rigidity — but it requires careful planning of shared structural members. Freestanding levels are simpler to sequence but must each carry their own complete load path. Incorrect connection assumptions produce under-built frames that either fail inspection or develop movement over time.
Beam Type and Height Clearance
The beam choice affects structural layout and the finished appearance. A flush beam in the wrong application creates a frame that's hard to waterproof; a drop beam sitting too close to grade traps moisture and accelerates deterioration. Make this decision before setting posts.
Step Rise Consistency
Measure the total height between levels before framing, then divide evenly. Settle on the number of steps — and whether a transition box is needed — before cutting or attaching anything. It's the most common cause of failed stair inspections.
Footing Depth and Soil Conditions
Footings must extend below the local frost line. In Massachusetts — including Cape Cod and Martha's Vineyard — that means 48 inches per 780 CMR. Sandy or coastal soils may require wider footings or engineered solutions to achieve stable bearing. Undersized footings let posts shift with the freeze-thaw cycle, and that movement telegraphs straight through to the upper levels.
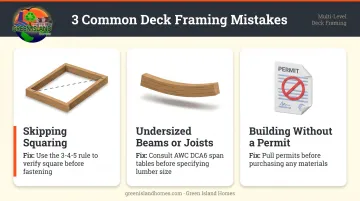
Common Mistakes When Framing a Multi-Level Deck
Even experienced builders run into trouble with multi-level decks. These three mistakes account for the majority of failed inspections and costly corrections:
- Skipping the squaring step creates cascading alignment problems across decking, stairs, and railings. Use the 3-4-5 rule at every level before locking in the frame.
- Undersizing beams or joists — without consulting span tables or a structural engineer, you risk a springy, unsafe surface that won't pass inspection. Span requirements shift based on joist spacing, decking weight, and live load assumptions.
- Building without a permit is unlawful in Massachusetts. Building officials can issue stop-work orders, require corrections, or demand removal of unpermitted work entirely. Pull permits before purchasing materials.
Frequently Asked Questions
Frequently Asked Questions
How much does it cost to build a multi-level deck?
According to HomeAdvisor's 2025 deck cost data, multi-level decks average $50 per square foot, with a range of $30–$75 per sq. ft. depending on size, materials, and labor rates. Multi-level builds cost more than single-level decks because of additional framing, hardware, and stair complexity. Get local contractor quotes for accurate project budgeting.
What is the 3-4-5 rule for decking?
Measure 3 feet along one side of a corner and 4 feet along the perpendicular side. If the diagonal between those two points measures exactly 5 feet, the corner is a true 90-degree angle. Larger multiples (6-8-10 or 9-12-15) work better on bigger frames.
Do I need a permit to build a multi-level deck?
Yes, in most cases. IRC R105.2 only exempts small, low, detached decks that don't serve the required exit door — most attached or elevated decks fall outside that exemption. Contact your local building department before starting.
What is the difference between a freestanding and connected multi-level deck?
A freestanding deck uses independent structural support with no shared framing between levels; a connected deck attaches one level's framing directly to the adjacent level. Local code may dictate which approach is required, and connected designs place higher demands on ledger connection quality.
What is a transition box step in a multi-level deck?
It's a small framed platform placed between two deck levels to create an intermediate step when the height gap is too large to span with a single code-compliant rise. It splits the height difference across two or more steps.
How deep should deck footings be for a multi-level deck?
Footings must extend below the local frost line. On Cape Cod and Martha's Vineyard, Massachusetts 780 CMR sets that depth at 48 inches statewide. Sandy or coastal soils may require wider footings or engineered solutions — verify requirements with your local building department.