The EPA notes that wet materials left unaddressed for just 24–48 hours can trigger mold growth. What starts as one missing shingle can quietly become a mold remediation job, a rotted deck, and a ceiling leak — all far more expensive than the original repair.
This guide covers why shingles go missing, how to replace one step by step, how to decide between repair and full replacement, and when to call a licensed professional.
Key Takeaways
- Missing shingles expose your roof deck to rain, wind, and UV damage — address them promptly.
- Common causes: storm winds, aging sealant, improper nailing, and debris impact.
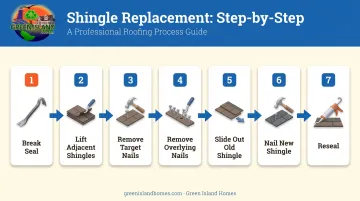
- Replacement follows 7 steps: break the seal, lift adjacent shingles, remove nails, slide out old, slide in new, re-nail, and reseal.
- Widespread or aging-roof damage? Full replacement beats repeated patch jobs.
- Steep roofs, multi-shingle damage, or uncertain deck conditions? Hire a licensed pro.
Why Missing Shingles Are a Bigger Problem Than They Look
Asphalt shingles work as a system. Each course overlaps the one below it, channeling water off the roof and away from the deck. Remove one shingle, and water doesn't fall straight through — it travels laterally under adjacent shingles, soaking the underlayment and reaching the roof deck below.
From there, the damage cascades:
- Underlayment failure — saturated felt or synthetic underlayment loses its ability to shed water
- Deck rot — plywood or OSB sheathing absorbs moisture, weakens, and begins to deteriorate
- Attic mold — warm, damp attic conditions accelerate mold growth within days of water entry
- Interior ceiling damage — water eventually finds its way through, staining drywall and insulation
HomeAdvisor estimates average mold remediation costs at $2,368, with many projects running higher. A shingle repair, by contrast, often costs a fraction of that.
Those cost differences matter even more on Cape Cod and Martha's Vineyard, where the climate amplifies every vulnerability. Nor'easters between September and April bring sustained gale-force winds and wind-driven rain. A gap in the roof during storm season invites water infiltration, ice dam formation, and accelerated granule loss on the shingles left exposed around it.
Common Reasons Shingles Go Missing
Understanding the cause matters. Replacing a shingle without addressing what broke it usually means the replacement fails just as fast.
The four most common culprits:
- Wind exceeding the shingle's rated resistance
- Sealant failure after years of UV exposure and temperature cycling
- Impact damage from hail, branches, or storm debris
- Poor installation — incorrect nailing that leaves shingles vulnerable from day one
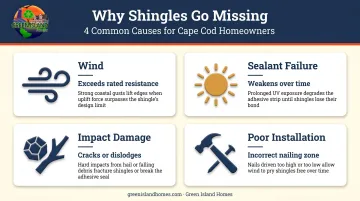
Wind
Shingles carry a wind resistance rating, and they can be lifted and torn off when speeds exceed it. Nor'easters regularly produce gusts well above 60 mph along the New England coast. Shingles that were improperly nailed — too few nails, or placed above the designated nailing zone — are especially vulnerable to uplift even at moderate wind speeds.
Sealant Failure
Each shingle has a self-sealing asphalt strip that bonds it to the course below. Over years of UV exposure and seasonal temperature swings, that sealant weakens. Once it loses adhesion, even moderate wind is enough to lift and remove the shingle.
GAF notes that self-sealing shingles need warm, sunny conditions over several days to fully bond. Fall or winter installations may not seal until the following spring — a vulnerability window that homeowners often don't know exists.
Impact Damage
Hail, falling branches, and storm debris can crack or dislodge shingles directly. Sometimes the damage shows immediately; other times it creates a weakened area that fails in the next storm.
Poor Installation
Shingles nailed too high (above the nailing zone), with incorrect spacing, or without proper starter strip adhesion fail prematurely. A licensed installer follows manufacturer nailing specs precisely — those shortcuts are invisible until shingles start blowing off.
How to Replace Missing Shingles: Step-by-Step
Before you start: IKO and most major manufacturers recommend shingle replacement be performed by a trained roofing professional. OSHA reports that falls are the leading cause of death in construction, with 389 fatal falls in 2024 alone. If you proceed as a DIY project, only do so on a dry day on a low-slope roof you can safely access — with non-slip footwear, a properly secured ladder, and a roof harness.
Gather Your Tools and Materials
- Replacement shingle (matching color, profile, and brand as closely as possible)
- Flat pry bar
- Roofing hammer
- Galvanized roofing nails
- Asphalt plastic roofing cement
- Caulk gun or putty knife
- Utility knife
- Safety harness and non-slip footwear
Matching the replacement shingle matters for more than aesthetics. Different manufacturers and product lines vary in thickness, tab dimensions, and granule texture — mismatches can create gaps or raised edges at the seam that affect weather performance.
Step 1: Break the Seal on the Target Shingle
Slide a flat pry bar carefully under the lower edge of the shingles neighboring the damaged one to break the asphalt sealant bond. This is easiest in cool weather when sealant is less pliable — but note that shingles below 40°F become brittle and can crack if bent. Handle them carefully.
Step 2: Lift Adjacent and Overlying Shingles
Lift the overlying shingle course (and any offset shingles beside the target) enough to expose the nail zone. Because successive courses are offset, you may need to work on shingles both directly above and diagonally adjacent to the target.
Step 3: Remove the Target Shingle's Nails
Slide the pry bar underneath the shingle, pressing it tight against each nail, and pry upward to lift shingle and nail together. Prying from above damages granules — and there are typically four nails in the target shingle's nailing zone, so work through each one.
Step 4: Remove the Overlying Course's Nails
Each shingle is held by two rows of nails — its own row, and the row from the course above that passes through its top edge. After removing the target shingle's four nails, locate and remove the nails from the overlying course that also penetrate the top of the target shingle.
Step 5: Slide Out the Old Shingle
With all bonds broken and all nails removed, the old shingle slides out freely. Clean the area of debris and dried adhesive. If the underlayment beneath is torn or visibly wet, patch it with roofing cement before proceeding — installing a new shingle over damaged underlayment doesn't solve the underlying problem.
Step 6: Slide In the New Shingle and Nail It Down
Align the new shingle precisely with adjacent shingles and nail it within the manufacturer's designated nailing zone using galvanized roofing nails. Re-nail any overlying shingles where nails were removed earlier.
Step 7: Reseal All Disturbed Shingles
Apply three small, evenly spaced dabs of asphalt plastic roofing cement under the new shingle's tabs and press flat. Do the same for any surrounding shingles whose sealant bonds were broken during removal.
Don't skip resealing. Shingles won't re-bond on their own until heat reactivates the sealant strip — which can take weeks — leaving every disturbed shingle vulnerable to wind uplift in the meantime.
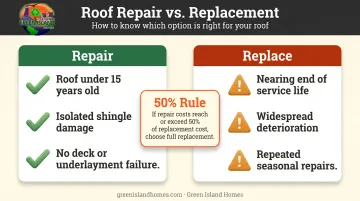
When Should You Repair vs. Replace Your Roof?
The right answer depends on the roof's age, the extent of damage, and simple math.
The Basic Framework
| When It Makes Sense | |
|---|---|
| Repair | Roof is under 15 years old, damage is limited to isolated shingles, no signs of deck or underlayment failure |
| Replace | Roof is nearing end of service life, deterioration is widespread, or you're making repairs every season |
The 50% Rule
As a practical benchmark: if the cost of repairing damaged sections approaches 50% or more of the cost of a full replacement, replacement is the better investment. A new roof also comes with full warranty coverage, better energy performance, and improved resale value.
For context, HomeAdvisor's 2025 data puts average asphalt shingle repair at $1,174 (most projects: $366–$1,985). Full roof replacement averages $9,600 nationally, with most in the $5,900–$13,367 range. Cape Cod and Martha's Vineyard homeowners should budget toward the higher end given regional labor and material costs.
Signs That Point to Replacement
- Granule loss across large areas (check gutters after storms)
- Multiple shingles missing after a single weather event
- Visible sagging or soft spots on the deck
- Daylight visible from the attic
- Recurring interior leaks despite previous repairs
A professional inspection is the most reliable way to make this call. Green Island Homes is fully licensed, insured, and HomeAdvisor Top Rated, serving Cape Cod and Martha's Vineyard homeowners with straightforward roofing assessments — whether that means a targeted shingle repair or a full replacement.
Common Mistakes to Avoid
Even a straightforward shingle replacement can go wrong fast. These are the four mistakes that turn a minor repair into a bigger problem:
- No sealant after reinstallation. Disturbed shingles need manual resealing immediately — don't rely on summer heat to do it for you. In fall or winter, that natural bonding won't happen for months, leaving the shingle exposed to wind uplift the whole time.
- Mismatched replacement shingles. Shingles from a different manufacturer or production run can vary in thickness, tab size, and granule color. That seam between old and new becomes both a visual issue and a structural weak point.
- Working in hazardous conditions. Wet, icy, or frost-covered roofs are serious slip hazards. Work only in dry conditions with proper footwear and a harness on anything steeper than a low-slope roof. OSHA requires fall protection on any roof surface 6 feet or more above a lower level.
- Replacing without investigating the cause. If you don't check whether improper nailing, flashing failure, or deck damage caused the loss, the new shingle may fail just as quickly as the one it replaced.
Preventive Tips to Keep Your Roof in Good Shape
- Schedule biannual inspections — spring after winter storms, fall before storm season. The NRCA recommends this timing to catch cracked or missing shingles, deteriorated flashings, and granule buildup before they become costly repairs.
- Keep gutters clean. Clogged gutters force water to back up under shingles. On Cape Cod and Martha's Vineyard, debris accumulation accelerates after every storm.
- Maintain proper attic ventilation. Trapped heat and moisture weaken sealant bonds, accelerating shingle failure and increasing the risk of ice dams in winter.
- Trim overhanging branches to reduce impact risk from falling limbs and limit moisture and leaf debris accumulation on the roof surface.
Frequently Asked Questions
How much does it cost to get shingles repaired?
Most asphalt shingle repairs fall between $366 and $1,985, with an average around $1,174, according to HomeAdvisor's 2025 data. Final cost depends on shingle count, roof pitch, material type, and local labor rates. Cape Cod and island projects often run higher due to logistics.
Can you replace just a few shingles on your roof?
Yes — individual shingles can be replaced without disturbing the rest of the roof. The main challenge is matching color and profile exactly, which gets harder as existing shingles age and weather. A professional should also assess whether isolated damage points to a broader underlying issue.
What causes shingles to go missing?
The most common causes are high wind exceeding the shingle's rated resistance, aging sealant failure that allows shingles to loosen over time, improper installation (too few nails or placement above the nailing zone), and physical impact from hail or falling debris.
Is it safe to replace shingles yourself?
Single shingle replacement on accessible, low-slope roofs is manageable for a careful DIYer with the right tools. Steep roofs, multi-story homes, or structurally uncertain conditions warrant a licensed professional, as fall injuries on residential roofs are both serious and common.
How long does it take to replace a missing shingle?
An experienced roofer can typically complete a single shingle replacement in 30–60 minutes. DIYers should budget more time, especially for safely accessing the roof, sourcing matching materials, and ensuring proper resealing.
How do I know if my roof needs full replacement instead of repair?
Key signals include widespread granule loss, repeated leaks, visible deck sagging, a roof older than 20–25 years, or repair costs nearing half the price of full replacement. A licensed roofer inspection is the most reliable way to confirm.