That simplicity is deceptive, though. Many homeowners underestimate how much site prep, foundation accuracy, and product-specific installation details determine whether a composite deck lasts 25+ years or starts sagging and voiding its warranty within a few seasons.
This guide covers everything: when a ground-level Trex deck makes sense, what materials you need, the exact build steps, and the most common mistakes that cause real problems.
Key Takeaways
- Ground-level Trex decks (under 30 inches) skip ledger boards, guardrails, and complex stairs, making them more manageable for DIYers with intermediate skills
- Never rest Trex boards on bare soil; the frame requires stable foundation supports and proper drainage beneath
- Use pressure-treated lumber rated for ground contact when joists sit less than 6 inches above grade
- Space joists 16" on center for perpendicular layouts, or 12" on center for 45-degree diagonal patterns
- In Massachusetts, call 811 at least 72 business hours before digging—a legal requirement under state law
When Is a Ground-Level Trex Deck the Right Choice?
Ground-level decks work best when the yard is relatively flat and the goal is a low-maintenance outdoor living surface. Common applications include:
- Dining and entertaining areas off the back of the house
- Pool or hot tub surrounds
- Patio replacements where a concrete slab has deteriorated
- Lounge spaces in side yards or garden areas
Trex composite suits these applications because decks built close to grade face a tough environment. Wood in that position deals with constant moisture, limited airflow, and insect pressure — conditions that accelerate rot. Composite handles all three more reliably, which is why it's a practical choice for coastal properties like those on Cape Cod where ground moisture stays elevated year-round.
When It Gets More Complicated
A few conditions push a ground-level deck into more complex territory:
- Sloped yards with significant grade changes require either a stepped foundation or a raised frame on one side, which changes the structural math
- Clay-heavy or poorly draining soil traps moisture beneath the deck and creates ongoing settlement issues
- Freeze-thaw climates: Cape Cod's winters create real frost-heave risk. Shallow foundations shift with the ground, so frost-depth footings are often required for attached builds
- Wetland proximity: On Cape Cod and Martha's Vineyard, lots within 100 feet of a wetland trigger Conservation Commission review before any ground disturbance. Edgartown's local buffer extends to 200 feet in some areas
If your site has any of these conditions, get a professional assessment before committing to a design. The scope — and the cost — can shift significantly once site-specific constraints come into play.
What You Need Before You Build
Equipment and Materials
Tools:
- Tape measure, chalk line, speed square
- Circular saw and miter saw
- Drill/driver with bits rated for composite and treated lumber fasteners
- Post-hole digger or shovel
- 4-foot level and string line with stakes
- Mason's string
Framing materials:
- Pressure-treated lumber rated for ground contact (AWPA UC4A minimum when joists are less than 6 inches above final grade)
- Concrete deck blocks, adjustable pedestals, or poured footings depending on your site and local code
- Joist hangers and structural connectors rated for treated lumber
- Composite deck screws or Trex Hideaway® Universal Hidden Fasteners
Trex-specific accessories:
- Trex decking boards in your chosen collection (Trex Enhance® for value-focused builds, Trex Transcend® for premium finishes)
- Trex Protect™ Joist Tape — self-adhesive butyl tape for the tops of all joists and beams
- Trex Hideaway® Universal Starter Clips for the first board along each perimeter edge
- Weed barrier fabric and compacted gravel for beneath the deck
Permits, Codes, and Site Checks
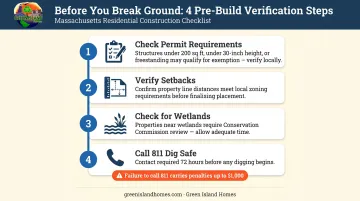
Having materials staged means nothing if a permit issue or utility conflict stops the project on day one. Work through this checklist before breaking ground:
Check permit requirements — Massachusetts 780 CMR exempts decks meeting all four conditions: 200 sq ft or less, no more than 30 inches above grade, not attached to the house, and not serving a required exit. Miss any one of those and you need a permit. Local zoning and HOA rules may add requirements on top of the state baseline.
Verify setbacks — most municipalities require a minimum distance from lot lines, and this varies town by town.
Check for wetlands — coastal properties near wetlands, dunes, or flood zones trigger Conservation Commission review even for small, low decks. Don't assume your lot is clear without checking.
Call 811 — Massachusetts law requires you to call Dig Safe at least 72 business hours before any excavation. First-offense penalties start at $1,000.
How to Build a Ground Level Deck with Trex: Step-by-Step
Step 1: Plan the Layout and Prepare the Site
Start with dimensions that align with standard Trex board lengths (8, 12, 16, and 20 ft) to reduce cut waste. A 10x16 or 12x16 footprint typically works well for most residential applications.
Layout:
- Drive stakes at approximate corners and run mason's string to outline the perimeter
- Check for square by measuring diagonally corner to corner—both measurements must match
- Adjust until the layout is true before committing to any excavation
Site prep:
- Remove sod and organic material down to firm subsoil
- Grade the soil to slope slightly away from any adjacent structure
- Install weed barrier fabric across the entire footprint
- Add 2-3 inches of compacted gravel on top of the fabric—this improves drainage and gives each support a stable, level base
Step 2: Install the Foundation
Foundation choice depends on your soil, local code, and frost conditions. Common options:
| Type | Best For | Notes |
|---|---|---|
| Precast concrete deck blocks | Flat, stable soil; detached decks | Cost-effective; every block must be set to exactly the same height |
| Adjustable pedestals | Uneven grades; hard surfaces | Easy height adjustment; growing in use for low-profile builds |
| Poured surface footings | Solid bearing without a separate beam | Eliminates one framing layer |
| Frost-depth poured footings | Attached decks; freeze-thaw climates | Massachusetts frost line is 48 inches; often required by local code |
Use a string line and 4-foot level to confirm every support point is at the same height before building the frame. Compact the gravel base under each support point before setting it.
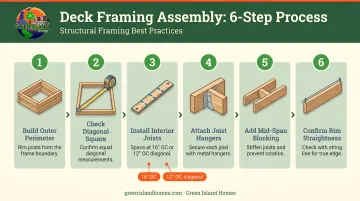
Step 3: Build the Frame
Get the framing sequence right and the rest of the build follows cleanly.
A few rules before you assemble anything:
- Mark the crown (the natural bow) on each piece of framing lumber—install with crown facing up so the joist sits flat as it settles
- Use fasteners rated for ACQ-treated lumber; standard screws corrode on contact
Assembly sequence:
- Build the outer perimeter frame first using rim joists fastened at corners with structural screws
- Measure diagonally to confirm the frame is square before anchoring it to the foundation
- Install interior joists at 16" on center for standard perpendicular Trex layouts, or 12" on center for diagonal 45-degree patterns—both are Trex-specified requirements, not suggestions
- Use joist hangers at each interior joist-to-rim connection
- Add blocking mid-span to stiffen the frame and reduce bounce underfoot
- Run a string line along each rim joist before final fastening to confirm straightness
Step 4: Protect the Frame and Install Trex Decking Boards
Frame protection first: Apply Trex Protect™ Joist Tape to the top of every joist, rim joist, and beam before a single decking board goes down. Press it firmly from end to end. This butyl tape seals around fasteners and blocks moisture from penetrating the framing—it can add years to the life of your substructure beneath composite boards.
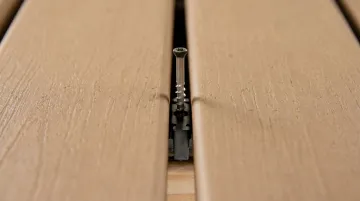
Installing the decking:
The Trex 2023 installation guide specifies the following. Follow these exactly—deviating can void warranty coverage:
- Trim at least 3/16" off each board end before installation to ensure a clean, square edge
- Install the first board with a Trex Hideaway® Universal Starter Clip flush with the outer rim joist
- Work board by board using hidden fastener clips—this creates a fastener-free surface
- Gap requirements:
- End-to-end gaps: 1/8" when installing above 40°F; 3/16" below 40°F
- Side-to-side gaps: 3/16" minimum
- Against solid objects (walls, trim): 1/4" above 40°F, 1/2" below 40°F
- Check straightness with a chalk line every 4-5 rows
- Before you reach the final 3-4 boards, measure to confirm the last board will land at an acceptable width
Step 5: Install Fascia and Finishing Touches
Fascia installation:
- Use composite or PVC spacers behind the fascia at each fastener point—this allows airflow behind the board and prevents bowing
- Predrill all fastener holes before attaching
- Miter outside corners at 45 degrees for a clean finish
- Fasten from the middle of each board outward to control any bow
Steps and finishing elements:
- Measure total rise from deck surface to grade
- For a single-step transition, a simple box frame topped with matching Trex decking works well
- Multiple steps require pressure-treated stringers with Trex tread boards on top
- Add built-in planters, seating, or privacy screens as the design calls for
Common Mistakes to Avoid
Skipping Permits and Local Code Checks
A deck that fails inspection gets demolished or reworked at your expense. Coastal communities on Cape Cod and Martha's Vineyard layer Conservation Commission review on top of standard building permits — always verify before digging.
Inadequate Intermediate Support
Joists cannot span freely without intermediate bearing points. Skipping beams or under-sizing deck block spacing leads to bounce, sagging, and structural failure. Composite boards also show deflection more visibly than wood when the frame beneath them isn't properly supported.
Blocking Ventilation Beneath the Deck
Trapped moisture is the primary threat to any low-clearance deck. Solid skirting around the perimeter cuts off airflow. Trex requires air circulation to keep boards performing correctly — leave open gaps at the perimeter or use lattice-style skirting that allows air movement.
Wrong Joist Spacing for Trex
Trex's warranty explicitly excludes damage from improper installation, including failure to follow spacing guidelines. The standard 24" on-center spacing used for wood decking is not acceptable for Trex composite. Use 16" OC for perpendicular layouts and 12" OC for diagonal ones.
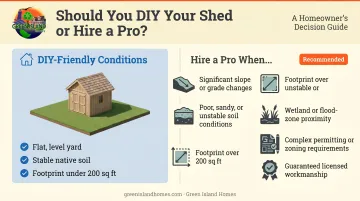
Should You DIY or Hire a Pro?
A ground-level Trex deck is one of the more accessible DIY deck projects available. Without a ledger board attachment, elevated posts, or required guardrails, the complexity is manageable for a homeowner with intermediate carpentry skills. Trex estimates a 10x16 freestanding ground-level deck takes about 12 hours for a two-person team—not counting permitting, site prep, or concrete curing time.
DIY success depends on precise layout, correct foundation setting, and strict adherence to Trex's installation specs. Errors in any of those areas are costly to correct once the framing is down.
When to Hire a Professional
Consider bringing in a licensed contractor when:
- The yard has significant slope or drainage issues
- Soil conditions are poor (saturated, clay-heavy, or sandy coastal soil that shifts)
- The deck footprint exceeds 200 sq ft and requires engineered footings
- The property sits near wetlands and triggers Conservation Commission review
- Local zoning is complex and you want the permitting handled correctly
- You simply want guaranteed workmanship without the learning curve
Green Island Homes builds decks on Cape Cod and Martha's Vineyard for homeowners who want the job handled correctly—fully licensed and insured, with direct familiarity with local code requirements and the coastal soil and drainage conditions that make these projects more involved than they look on paper. If your project falls into any of the above categories, reach out for a free estimate before committing to a DIY build.
Proper permitting and construction protect the investment either way. The JLC 2025 Cost vs. Value report puts composite deck additions at roughly 89% cost recouped at resale—a return that holds only when the build meets code.
Frequently Asked Questions
What do you put under a ground level deck?
Install weed barrier landscape fabric first, then a layer of compacted gravel for drainage. Place your foundation supports (deck blocks, pedestals, or concrete footings) on top of the gravel. Never build directly over bare soil or grass—both hold moisture and cause settling.
Do you need a permit to build a ground level deck?
Massachusetts 780 CMR exempts decks that are 200 sq ft or less, under 30 inches above grade, freestanding, and not serving a required exit—miss any one condition and a permit is required. Cape Cod and Martha's Vineyard properties near wetlands may also need Conservation Commission approval regardless of deck size.
Can Trex decking be installed close to the ground?
Yes, but only with proper substructure. Trex requires a minimum sleeper height of 1-1/2 inches and recommends 3-1/2 inches or greater where debris can accumulate. Boards must never rest directly on soil or a solid, watertight surface—drainage, airflow, and continuous support along the board's length are non-negotiable.
Do you need footings for a ground level deck?
Some form of approved foundation is always required. Precast deck blocks, adjustable pedestals, or poured concrete footings are the typical options. In freeze-thaw climates like Cape Cod, frost-depth footings (48 inches in Massachusetts) are often required for attached decks. Your local building department will confirm which foundation type applies to your specific site and build.
How far apart should joists be for a Trex ground level deck?
Trex requires joists at 16" on center for perpendicular decking layouts and 12" on center for 45-degree diagonal patterns. Always confirm spacing against the installation guide for your specific Trex product collection.
How long does it take to build a ground level Trex deck?
Trex estimates 12 hours for a two-person team on a standard 10x16 freestanding deck—though complex builds like a 12x16 with a picture-frame border can run closer to 32 hours. Neither estimate includes permitting lead time, site prep, or concrete curing.