When installation goes wrong, the problems are predictable: water intrudes behind boards, premature rot sets in, splitting occurs from wrong fasteners, and boards pull away from the wall over time. Most of these failures trace back to mistakes made in the first few hours of the job.
This guide walks through the complete cedar siding installation process — from wall prep to post-installation checks — so you understand what correct looks like at each stage.
Key Takeaways
- Cedar siding is DIY-possible but not beginner-friendly — correct prep, nailing, and overlap are non-negotiable
- Install over a water-resistant barrier (house wrap) with seams lapped at least 6 inches
- Use only hot-dipped galvanized or stainless steel nails — anything else will rust and stain
- Overlap each course by at least 1 inch and leave a 1/8-inch expansion gap at board ends
- Apply stain or sealer only after installation and caulking are complete
Before You Begin: Prerequisites, Tools, and Surface Prep
The wall has to be ready before a single board goes up. Installing cedar over compromised sheathing or a poorly installed moisture barrier creates failures that are expensive and disruptive to fix once siding is in place.
Wall and Barrier Requirements
These are non-negotiables before installation begins:
- Wall sheathing must be intact with no soft spots, rot, or water damage — probe any suspicious areas with a screwdriver before proceeding
- House wrap must be installed and properly overlapped; DuPont Tyvek's 2025 installation guidelines require the upper WRB course to overlap the lower by a minimum of 6 inches
- Seams must be taped; upper layer always goes over lower (the shingling principle, required by IRC 2024)
- Flashing must be installed around all windows, doors, and wall penetrations before siding starts
For homes on Cape Cod and Martha's Vineyard, salt-air and wind-driven moisture put extra demands on the barrier system. Building Science Corporation identifies driving rain as the largest single moisture source for most wall assemblies, and in coastal environments, any gap in the WRB is a direct path to structural damage.
Homeowners in these areas should consider consulting a licensed contractor like Green Island Homes to assess wall readiness before proceeding.
Tools and Materials Checklist
| Category | Items |
|---|---|
| Cutting | Circular saw or miter saw |
| Fastening | Hammer or pneumatic nail gun |
| Layout | Chalk line, level, tape measure, pencil |
| Removal | Pry bar (if replacing existing siding) |
| Substrate | Furring strips or starter strip |
| Fasteners | Hot-dipped galvanized or stainless steel nails |
| Barrier | House wrap, seam tape, flashing |
| Material | Cedar siding boards |
Fastener Selection
This detail trips up a lot of DIY installations. The rules are straightforward:
- Hot-dipped galvanized (ASTM A153/A153M standard) is the minimum acceptable fastener for cedar siding
- Stainless steel (No. 304) is best practice for general installations
- Stainless steel (No. 316) is required for seacoast exposures — Cape Cod and Martha's Vineyard properties should use No. 316 as standard per WRCLA guidance
- Electro-galvanized and iron nails will rust and cause black staining on cedar — do not use them
- Copper nails react with cedar's natural oils and should not be used, per WRCLA specifications
How to Install Cedar Siding: Step-by-Step
Cedar siding installation follows a strict bottom-to-top sequence. Errors in the early stages compound visibly as you move up the wall: misaligned first courses, improper clearances, and missed flashing details become harder to correct with every row added.
Step 1: Prepare the Wall Surface
If you're replacing existing siding, remove it from the top down. As you go, inspect exposed sheathing for rot, damage, and old nails that need pulling. Repair any damaged areas fully before moving on. Do not side over compromised substrate.
Once the wall is clean:
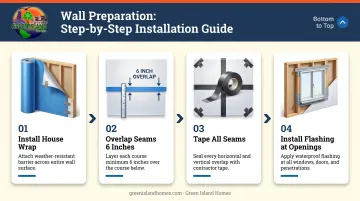
- Install house wrap over the sheathing, working bottom to top
- Overlap horizontal seams by at least 6 inches, upper layer over lower
- Tape all seams with compatible WRB tape
- Install flashing around every window and door opening in shingle fashion before siding begins
Step 2: Install the Starter Strip and First Course
The first course sets the angle and alignment for everything above it. Get this wrong and you'll be chasing the error all the way to the soffit.
- Install a furring strip or starter strip at the base of the wall to kick the first board out at the correct angle
- Use a long level to confirm it is perfectly horizontal — any deviation carries through every subsequent course
- Minimum ground clearance: the bottom edge of the lowest board must sit at least 6 inches above finished grade, per WRCLA general installation guidance
- Keep at least 1 inch above any flat surface like a deck or step to prevent moisture wicking
Step 3: Nail, Overlap, and Work Up the Wall
Nailing and overlap tolerances are tighter than most installers expect. Follow WRCLA specifications precisely:
Nailing technique for bevel/lap siding:
- Face-nail to studs with 1-1/4 inch penetration into solid wood
- Place nails just above the overlap of the board below
- Never nail through both boards at the overlap point — this prevents the lower board from moving with seasonal expansion
- For boards wider than 8 inches, use two nails per stud
- Keep nails at least 1 inch from board edges to prevent splitting
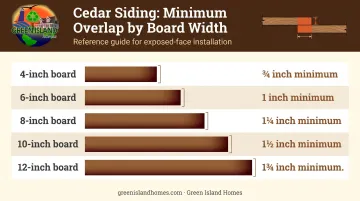
Overlap requirements by nominal board width:
| Nominal Width | Minimum Overlap |
|---|---|
| 4 inch | 1 inch |
| 6 inch | 1 inch |
| 8 inch | 1 to 1-1/8 inch |
| 10 inch | 1 to 1-1/2 inch |
| 12 inch | 1 to 2 inch |
Expansion gaps:
- Leave a 1/8-inch gap at butt joints between boards end-to-end (for air- or kiln-dried siding)
- Do not use caulk in place of flashing at joints — per WRCLA, caulking is not an acceptable substitute for proper flashing
- Stagger butt joints so they never align between adjacent courses; joints should land on studs
Step 4: Cut and Fit Around Windows, Doors, and Corners
Outside corners — two options:
- Mitered joint: Clean look, requires precision cuts and tight fitting
- Corner boards: Simpler and more forgiving; siding butts against the corner board on both faces
Inside corners butt directly against a square corner board installed before siding begins.
Around windows and doors:
- Measure and cut for tight fits against casings
- Leave a slight gap around casings to allow for wood expansion
- Seal all cut edges with end-grain sealer before installation — raw cross-cuts absorb moisture faster than any other part of the board and are the most common starting point for edge rot
Post-Installation Checks and Validation
Don't apply finish until you've confirmed the installation is correct. Catching flashing or alignment failures now takes minutes — catching them after staining means tearing into finished work to find the source.
Visual Checks
Walk the entire wall and confirm:
- All courses are level with consistent reveal (exposed face width) from bottom to top
- No butt joints align between adjacent rows
- All nails are seated just above the wood surface — not countersunk, not proud
- No boards are bowing or pulling away from the wall
Moisture Check
Run a garden hose along the wall from top to bottom. Inspect around windows, corners, and butt joints for any water penetration behind the siding. This is your last clear opportunity to catch flashing failures before finish is applied.
Applying Finish
- Apply stain, paint, or sealer only after installation and caulking are complete
- WRCLA finishing guidance states cedar moisture content should not exceed 20% at the time of finish application
- Oil-based semi-transparent stains typically last 3 to 6 years before reapplication is needed, per WRCLA care and maintenance guidance
Common Cedar Siding Installation Problems and Fixes
Boards Splitting During Nailing
Problem: Cedar splits at the nail point, particularly near board edges.
Likely cause: Wrong nail type, nailing too close to the edge, or using a pneumatic gun at too high a pressure on narrow boards.
Fix:
- Switch to stainless steel or hot-dipped galvanized finish nails
- WRCLA recommends "splitless" siding nails with thin shanks and blunt points
- Keep nails at least 1 inch from all edges
- Pre-drill narrow boards or hand-nail instead of gun-nailing
Wavy or Uneven Courses
Problem: Courses drift out of level as installation progresses up the wall.
Likely cause: No chalk line established before each course; starter strip was not level.
Fix:
- Snap a chalk line every 3 to 4 courses to reset alignment
- Use a long level regularly and adjust the reveal before nailing each new course
- WRCLA guidelines call for layout planning from soffit to foundation to ensure consistent overlap throughout
Moisture Infiltration at Butt Joints or Corners
Problem: Water appears behind siding at joints or corners after rain.
This usually means caulk was used where flashing is required, or corner boards weren't properly integrated with the house wrap.
Fix:
- Remove affected boards
- Install proper step flashing or Z-flashing behind joints and corners
- Reattach boards and leave the expansion gap unsealed
- WRCLA is clear on this: substituting caulk for flashing is not acceptable and is one of the most common causes of moisture damage in cedar siding installations
Pro Tips for a Better Cedar Siding Installation
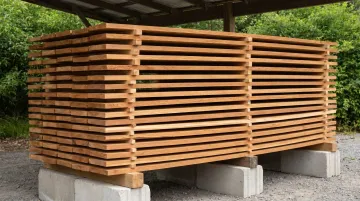
Acclimate Before You Install
Store cedar flat, off the ground, under cover but with airflow before installation begins. This lets the wood adjust to local humidity levels, reducing post-installation shrinkage or swelling. WRCLA guidance recommends stickered storage to allow ambient moisture equalization — especially important on Cape Cod and Martha's Vineyard, where seasonal humidity swings are significant.
Seal Every Cut Edge
Cross-cuts and rip cuts expose end grain that absorbs moisture far faster than the board face. Apply end-grain sealer to every cut end before the boards go on the wall. It takes minutes and prevents one of the most common causes of edge rot.
Know When to Call a Pro
Multi-story installations, homes with complex rooflines, and coastal properties facing high wind and moisture exposure leave little room for error. For properties where conditions are demanding, professional installation is worth the investment. Green Island Homes handles siding installation for homeowners across Cape Cod and Martha's Vineyard — reach them at 774-563-9714 or sales@greenislandhomes.com.
Conclusion
The lifespan of cedar siding comes down to installation discipline. Correct fasteners, proper overlap, adequate moisture barriers, and sealed cut edges aren't optional steps. Skip any of them, and you're looking at rot, warping, or fastener failure well before the wood reaches its potential lifespan.
Work through each phase carefully, run the moisture check before applying any finish, and don't skip the validation steps. Done right, cedar siding can protect a home for 30 to 40 years with minimal maintenance — that outcome is entirely within reach when every step gets the attention it deserves.
Frequently Asked Questions
What do you put under cedar siding?
A water-resistant house wrap or building wrap goes directly over the wall sheathing before cedar boards are installed. Flashing is required around all windows, doors, and wall penetrations — the house wrap alone is not sufficient at these transitions.
Which side of cedar siding faces out?
For bevel siding, the thick edge faces down and outward toward the viewer, with the thin edge tucked under the course above. Always confirm orientation against the manufacturer's installation guide for the specific profile you're using.
What nails should I use for cedar siding?
Hot-dipped galvanized or stainless steel nails are required. For coastal environments like Cape Cod and Martha's Vineyard, WRCLA specifies No. 316 stainless steel for seacoast exposure. Electro-galvanized and iron nails will rust and cause black staining on cedar over time.
How much should cedar siding overlap?
The minimum overlap is 1 inch for most profiles. Wider nominal boards require more — 10-inch boards need 1 to 1.5 inches and 12-inch boards need up to 2 inches. Always follow the overlap table for the specific profile being installed.
Do I need to seal or stain cedar siding after installation?
Finishing is not strictly required since cedar has natural rot resistance, but staining or sealing on a regular schedule — oil-based semi-transparent stains typically last 3 to 6 years per WRCLA — significantly extends siding life. Finish only the exterior face after installation is complete.
How long does cedar siding last?
Service life depends on installation quality, finish maintenance, moisture exposure, and climate. Well-installed cedar siding typically lasts 30 to 50 years, though coastal homes require more frequent finish reapplication and joint inspection to reach that range.