This guide is written for experienced DIYers comfortable with power tools, multi-day exterior work, and reading a level. It covers the full process — acclimation, wall prep, weather barrier, furring strips, board installation, and post-install validation — so you can either execute it correctly or know exactly what to expect when hiring a professional.
Key Takeaways
- Acclimate boards until they reach the target moisture content for your climate (~12% per USDA Forest Products Laboratory guidance), not just a fixed number of days
- Install a weather-resistant barrier (house wrap) and vertical furring strips — both are required to create a proper drainage plane
- Start at the bottom, set the first board to a true chalk line, and use blind nailing on every subsequent course
- Use stainless steel fasteners; galvanized will corrode in coastal salt air and stain boards within a few seasons
- Seal all six sides of every board before installation; seal every cut end within 24 hours of cutting
Before You Start: Prerequisites and Safety
Wall and Site Requirements
The wall must be ready before any siding goes up:
- Sheathing must be structurally sound, dry, and free of soft spots
- Old siding must be fully removed — never install over deteriorating material
- Permits and codes must be checked before work begins; Massachusetts 780 CMR governs exterior wall assemblies, and Cape Cod municipalities publish town-level wind load requirements that affect fastening schedules
- HOA rules — if applicable, get written approval before purchasing materials
Three hard stops before picking up a nail gun:
- Wet sheathing or active rain means the job waits — no exceptions
- Do not skip the weather-resistant barrier
- Boards must fully acclimate before fastening begins
Safety Gear
- Safety glasses when cutting
- Ear protection with power saws
- Work gloves for handling rough-cut boards
- Stable scaffolding or properly footed ladder for elevated sections — do not improvise staging on a multi-story wall
Tools and Materials Checklist
Before you start, confirm you have everything on hand. Missing a tool mid-install on Cape Cod—where lumber yard runs can eat half a day—adds up fast.
Tools
- Tape measure and chalk line
- Long level (minimum 3 feet)
- Miter saw or circular saw
- Jigsaw (for window and door cut-outs)
- Table saw (helpful for rip cuts on final rows)
- Pneumatic framing nailer or drill/driver
- Caulk gun
- Stud finder
- Carpenter's square and pencil
Materials
- Shiplap boards — order 10% extra for waste and cuts
- Weather-resistant barrier / house wrap
- 1×3 or 1×4 furring strips
- Corrosion-resistant fasteners (stainless steel nails or screws recommended for coastal climates)
- End-grain sealant
- Paintable exterior caulk
- Exterior primer and finish coat or paint
- Trim boards for corners and window/door surrounds
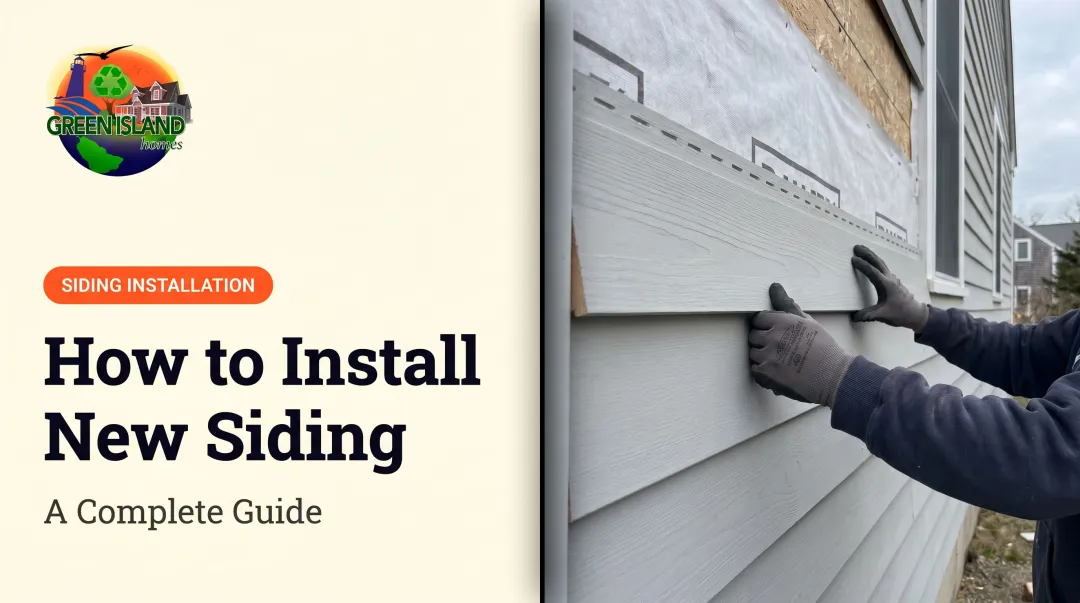
How to Install Exterior Shiplap Siding: Step-by-Step
The installation follows a strict sequence. Most failures (uneven courses, moisture intrusion, board movement) trace back to shortcuts in the early steps, not errors in the nailing itself.
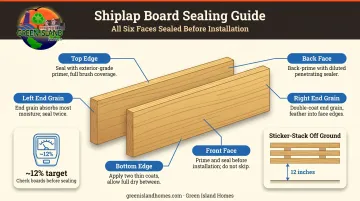
Step 1: Acclimate and Pre-Finish the Boards
Stack boards with wood stickers (shims) between each layer, at least 12 inches off the ground, in an outdoor or well-ventilated space. The goal isn't a fixed calendar — it's moisture equilibrium. USDA Forest Products Laboratory guidance puts the target for exterior siding at approximately 12% moisture content, within a regional range of 7–14%. Use a moisture meter to confirm boards have reached that range before installation.
Dense hardwoods take longer than cedar to acclimate. Boards delivered wet off a truck in humid July will take longer than boards stored under cover through a dry stretch.
Before the boards go up, apply primer or finish to all six sides (front, back, top, bottom, and both ends). Once a board is nailed to the wall, the back face is inaccessible. End grain absorbs moisture far faster than flat grain, making cut ends a particular priority.
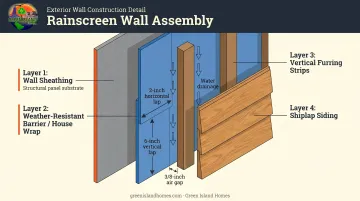
Step 2: Install the Weather-Resistant Barrier
Apply house wrap or building paper over the wall sheathing, working bottom to top in a shingle-lapping pattern. IRC R703.2 requires horizontal laps of at least 2 inches and joints lapped at least 6 inches.
Tape all horizontal seams and integrate the WRB carefully around windows and doors. Leave the bottom edge open for drainage rather than sealing it closed.
This layer is the primary defense against moisture reaching the sheathing. If it's discontinuous, improperly lapped, or missing entirely, water that gets past the siding has a clear path to the framing.
Step 3: Install Furring Strips
Use a stud finder to locate and mark wall studs, then snap a chalk line down each stud from top to bottom. Attach 1×3 or 1×4 furring strips vertically over each stud using corrosion-resistant screws long enough to penetrate at least 1.5 inches into the stud. Check each strip for plumb with your level; shim behind low spots to create an even plane.
Add horizontal furring around window and door perimeters to provide attachment points for cut boards.
This step creates the rainscreen air gap. Building Science Corporation identifies 3/8 inch as the reliable gap dimension for wood sidings : it allows drainage and gives the back of the siding enough airflow to dry between rain events. Skipping furring strips and nailing directly to the WRB eliminates this drying capacity entirely.
Step 4: Set the First Board Perfectly Level
Snap a chalk line where the top of the first board will sit. Maintain at least 6 inches of clearance between the bottom of the board and the ground or finished grade ; less clearance means moisture wicking will rot the board end from below.
Pre-drill pilot holes (1/8 inch) through the bottom half of the board above each furring strip, then drive 3-inch stainless steel screws to secure the bottom edge. Fasten the top flange through a pre-drilled hole into the furring strip — this fastener will be hidden by the next board.
This first board sets the reference for every course above it. Take the time to get it right.
Step 5: Install Subsequent Rows Using Blind Nailing
Fit the groove of each new board over the top lip of the board below, ensuring a snug but not forced fit. Drive a fastener through the top flange of the new board at every furring strip to hide the fastener and allow the board to expand and contract naturally with seasonal changes.
A few things to watch for:
- Check level every 3–4 courses using a long level or chalk line. Small errors compound; a 1/16-inch drift per row becomes obvious by the time you're halfway up the wall
- Stagger end joints on long walls so they don't line up vertically between rows , which improves weather resistance and structural integrity
- Do not over-gap between courses hoping to account for swelling; properly acclimated boards should install tightly
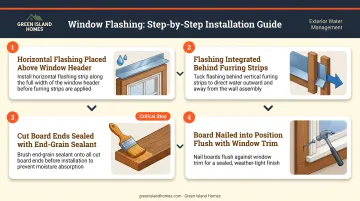
Step 6: Cut Around Windows, Doors, and Obstacles
Measure each opening carefully and transfer the measurements to the board before cutting. A jigsaw handles custom cuts around frames cleanly; a circular saw works for straight crosscuts.
Install horizontal flashing above all windows and doors before the siding courses reach that height. The flashing should run behind the furring strips and direct water outward, not just be caulked at the surface. Seal every cut end immediately with end-grain sealant before nailing the board in place.
Post-Installation Checks and Validation
Don't skip this phase. Catch problems now and they're repairs — miss them until after a harsh winter and they become replacements.
Visual check:
- Step back and inspect each course for consistent shadow line and level
- Look for boards bowing away from the wall or inconsistent gaps between courses
- Check corner and trim joints for tight, flush fits
- Confirm no fastener heads are visible on courses where blind nailing should have concealed them
Structural and moisture check:
- Press boards — they should not flex or rattle
- Inspect seams at windows, doors, and corners for caulk at vertical joints
- Confirm no caulk between horizontal courses — caulking horizontal seams traps moisture inside the assembly rather than letting it drain
- Scan for any unsealed cut ends and seal them immediately
Finish check:
- Confirm all surfaces have been primed and a topcoat is applied or firmly scheduled
- Verify no raw or unsealed wood remains on any exposed face or edge
Leaving unfinished wood exposed, even briefly, reverses the moisture protection built up during acclimation.
Common Installation Problems and Fixes
Boards Warping or Cupping After Installation
Boards that bow or cup away from the wall within weeks almost always trace back to the same root causes: insufficient acclimation, improper site storage (directly on the ground or under a sealed tarp), or finishing only the face side and leaving the back exposed to moisture from the wall cavity.
Minor cupping can sometimes be pulled back with additional fasteners. Severe warping requires board replacement. Pre-finishing all six sides and confirming moisture content before installation are the only reliable preventative measures.
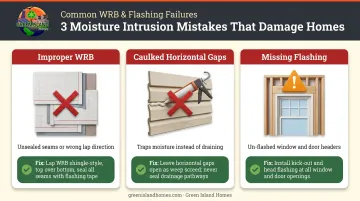
Moisture Intrusion Behind the Siding
Water stains, mold, or soft sheathing discovered after rain usually point to one of three entry points:
- Improperly installed WRB — unsealed seams or wrong lap direction
- Horizontal course gaps that were caulked instead of left open
- Missing flashing above windows and doors
The most common culprit is un-flashed window headers or incorrectly taped house wrap. Remove and correct the affected section, reinforce all seams with appropriate flashing tape, and confirm the rainscreen gap is clear.
Uneven Courses or Visible Racking
Courses that drift out of level — showing up as a racked or skewed appearance near the top — almost always mean the first board wasn't set to a true chalk line, or level checks were skipped along the way.
If caught within a few rows, remove boards back to the last confirmed level course and reset from there. If the entire wall is affected, you'll need to remove and reinstall from the first board. Checking level every 3–4 rows is the straightforward way to prevent this entirely.
Pro Tips for a Professional Result
Coastal fastener selection: In salt-air environments like Cape Cod and Martha's Vineyard, stainless steel fasteners are not optional. Galvanized hardware corrodes faster than expected in high-humidity coastal conditions and will leave rust streaks on siding within a few seasons. FEMA's coastal construction guidance identifies stainless steel as the long-term standard for corrosive oceanfront environments.
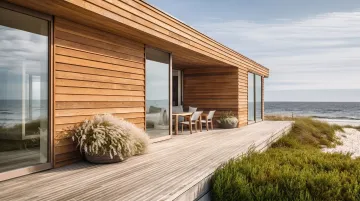
Wood species selection: For coastal cladding, cedar is the right call — its natural oils and built-in decay resistance outperform untreated pine in humid conditions. If you want help navigating material selection and code compliance for a Cape Cod or Martha's Vineyard project, Green Island Homes handles siding installations across both service areas.
Install trim first: Corner trim boards and window/door surrounds go up before any siding boards. Butt the siding up against the trim rather than running it behind — you'll get a cleaner seal at transitions and make caulking and painting noticeably easier.
Document as you go: Photograph the wall at each major phase — bare sheathing, house wrap, furring strip layout, first board placement — before the next layer covers it. Those photos pay off when you need to make a repair, file a warranty claim, or respond to a code inspection.
Conclusion
Exterior shiplap installation quality determines the siding's weather resistance, its aesthetic lifespan, and the structural health of the wall assembly behind it. Poor preparation creates problems that are expensive to diagnose and fix after the fact — often only discovered after the first winter.
Approach the project in sequence: acclimate to moisture equilibrium, install the drainage plane correctly, set the first board to a true chalk line, and validate each phase before moving on.
For homeowners who want the look of exterior shiplap without the risk of installation errors — particularly on Cape Cod or Martha's Vineyard where coastal conditions raise the stakes — Green Island Homes provides fully licensed and insured remodeling services from material selection through finished installation. Contact them at 774-563-9714 or sales@greenislandhomes.com.
Frequently Asked Questions
Can shiplap be used for exterior siding?
Yes. Shiplap's overlapping rabbet joint design sheds water and accommodates natural wood movement, making it well-suited for exterior use. What makes it perform reliably outdoors is correct installation over a weather-resistant barrier and furring strips — the joint profile alone doesn't compensate for poor detailing.
Do you need a vapor barrier behind exterior shiplap siding?
A weather-resistant barrier — house wrap or building paper — is essential. It prevents moisture from reaching the wall sheathing while still allowing trapped vapor to escape. Skipping it is one of the most consistent causes of rot and mould behind wood siding.
What type of wood is best for exterior shiplap siding?
Cedar is the top choice. Its natural oils and decay resistance make it the stronger default in humid and coastal climates. Pine is a budget-friendly alternative, but it requires more thorough sealing, more frequent maintenance, and more careful installation — particularly in salt-air environments.
How long does exterior shiplap siding last?
Properly installed and maintained cedar shiplap typically lasts 30–50 years. Service life varies by species, finish upkeep, fastener quality, and exposure — cedar in a non-coastal climate will significantly outlast untreated pine in salt air.
Should exterior shiplap be painted or stained before or after installation?
Prime and finish all six sides of each board before installation to seal the back and end grain, then apply a topcoat after installation. Seal any site-cut ends with end-grain sealant within 24 hours of cutting.
What is the best fastener for exterior shiplap siding?
Stainless steel nails or screws — they will not rust or stain the siding. Galvanised fasteners are an acceptable minimum in low-humidity inland locations, but stainless steel is the correct specification for coastal environments where corrosion is accelerated by salt air and humidity.