Introduction
Replacing the siding on your home is one of those projects where the difference between a 30-year result and a 5-year failure comes down entirely to process, not materials. Do it right and you've added decades of protection. Rush the sequence, skip the moisture barrier, or misplace a few nails, and you're looking at buckling panels, water damage behind the walls, and voided manufacturer warranties.
According to Angi, a full residential siding installation typically takes between one and two weeks. That's a significant disruption to your home, which makes getting the prep work right — before a single panel goes up — worth every hour you invest.
Experienced DIYers can handle vinyl siding on a simple, single-story home. Fiber cement, engineered wood, two-story structures, and homes with complex rooflines are a different matter entirely.
Coastal environments add another layer of difficulty. On Cape Cod and Martha's Vineyard, salt air, freeze-thaw cycles, and persistent humidity are unforgiving of installation shortcuts — the kind of conditions that expose every gap in your prep work within a season or two.
This guide covers every phase of the process, from material selection through final caulking — including the specific mistakes responsible for most siding failures:
- Choosing the right siding material for your climate and structure
- Preparing the substrate and installing moisture barriers correctly
- Sequencing and fastening panels to manufacturer specs
- Flashing, trimming, and caulking for a weathertight finish
Key Takeaways
- Full siding installation covers removal, sheathing inspection, moisture barrier application, and panel fastening; most projects take 7–14 days
- Choose your material first; it determines your tools, fastening method, and required skill level
- A properly installed weather-resistant barrier (house wrap) is mandatory before any panel goes up
- The three most common and costly mistakes: improper nailing, missing moisture barriers, and misaligned starter strips
- For coastal homes or complex exteriors, professional installation protects your investment and keeps warranties intact
Before You Start: Choosing Your Siding and Key Prerequisites
Comparing the Four Main Materials
| Material | Key Strengths | Coastal Considerations |
|---|---|---|
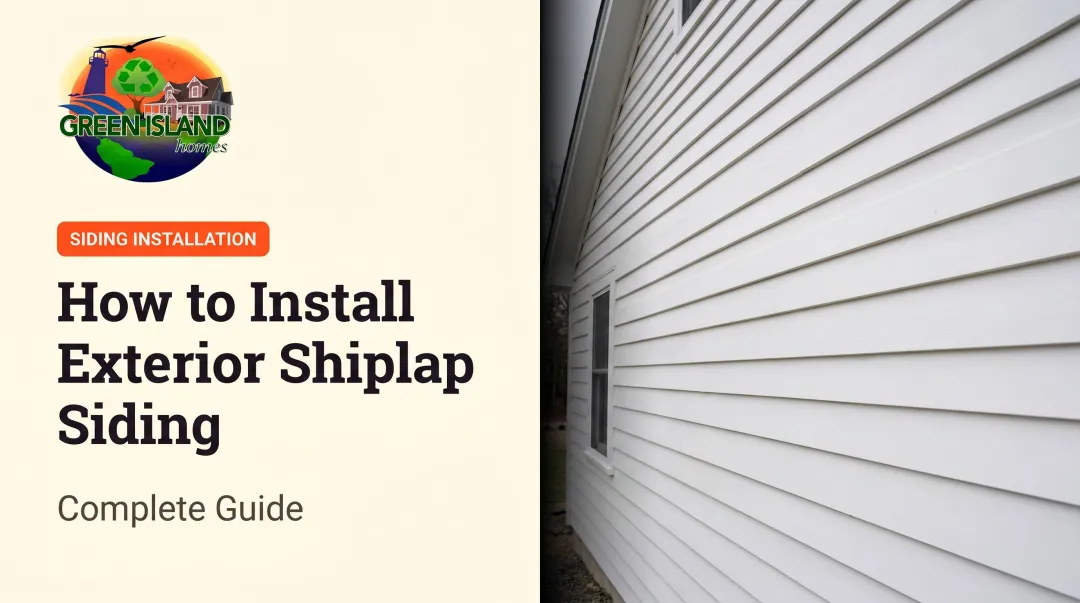
| Vinyl | Most affordable, low maintenance | Expands/contracts significantly with temperature; can become brittle in cold |
| Fiber cement | Fire and moisture resistant, very durable | James Hardie's HZ10 line is specifically engineered for salty sea air and hurricane-force winds |
| Engineered wood | Natural appearance, good weather resistance | LP SmartSide uses zinc borate treatment for fungal and termite resistance; 50-year warranty available |
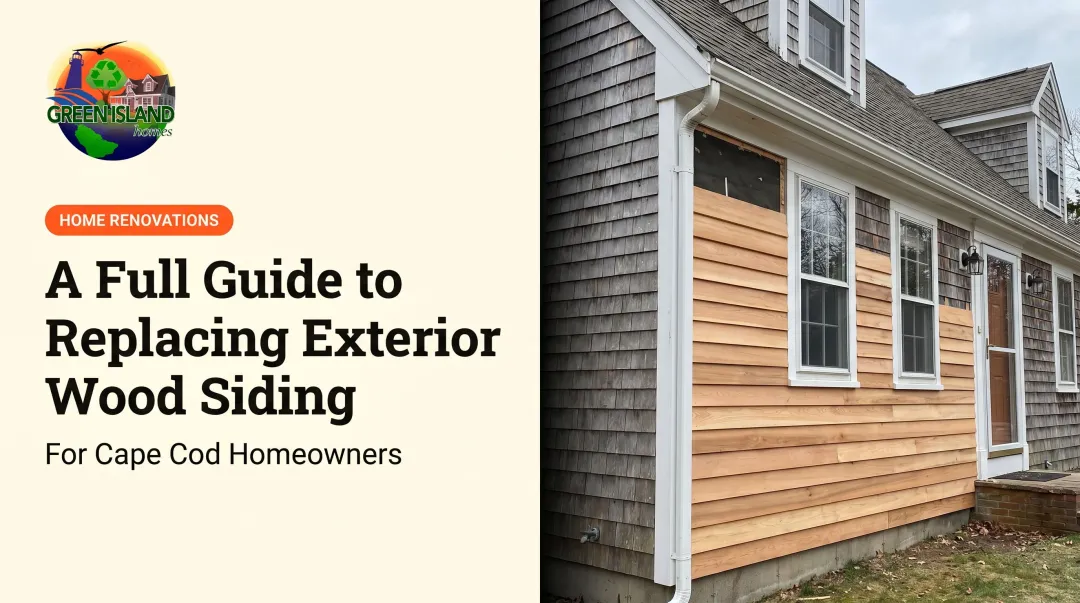
| Wood | Classic aesthetic | Demands the most maintenance; USDA research shows primer-based paint systems significantly outperform stains for outdoor wood durability |
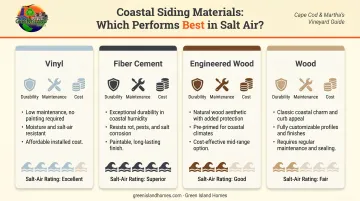
For Cape Cod and Martha's Vineyard homeowners, material choice matters more than almost anywhere else. Freeze-thaw cycles, salt air, and coastal humidity can shorten the lifespan of the wrong material by years. Once you've settled on a material, the next step is confirming your site is actually ready to receive it.
Structural and Site Prerequisites
Before ordering materials, confirm:
- Wall sheathing is dry, structurally sound, and free of rot or delamination
- No active pest damage or mold is present
- At least 6 inches of clearance exists between siding termination and finish grade (LP SmartSide requires this minimum)
- No active water infiltration is occurring
Stop here if you find significant rot in the sheathing, structural instability, or active water infiltration. New siding installed over damaged substrate will fail prematurely, and no amount of quality material or careful installation will change that.
Permit Requirements
Massachusetts building code (780 CMR 105.1) requires a permit for construction, reconstruction, alteration, and repair work. Full siding replacement is not listed among the exempt "ordinary repairs" in Section 105.2.2.
Before starting any work, confirm requirements with your local building department. In Barnstable, Falmouth, and Edgartown, permit applications are submitted online through each town's permitting portal.
Tools and Materials Checklist
Essential Tools
- Hammer or nail gun
- Level and chalk line
- Tape measure
- Tin snips or fiber cement saw
- Caulk gun and utility knife
- Ladders or scaffolding (scaffolding is non-optional for two-story homes)
Material-specific additions:
- Fiber cement: scoring blade or shear tool (do not use standard circular saw blades without dust control)
- Vinyl: standard tin snips work; avoid cutting in cold weather when panels become brittle
Core Materials
- Starter strips and J-channels
- Corner posts
- House wrap / weather-resistant barrier (WRB)
- Flashing tape
- Galvanized or stainless-steel fasteners — on Cape Cod and Martha's Vineyard, salt air accelerates corrosion faster than most homeowners expect. Simpson Strong-Tie identifies ocean salt air as a primary corrosion factor, and stainless steel fasteners are the stronger choice for any coastal installation
- Exterior-grade caulk rated for your specific material
- Trim boards
A Note on Safety
Before you start climbing, get your fall protection right. OSHA reports that falls caused 389 of 1,034 construction fatalities in 2024. For elevated siding work, scaffolding is not a convenience — it's a safety requirement. Undersized ladders and improvised staging cause a disproportionate share of installation injuries every year.
How to Install New Siding: Step-by-Step
Skipping or reordering steps — especially the moisture barrier phase — creates failure points that won't become visible until water damage has already occurred inside the wall. Follow this sequence exactly.
Step 1: Remove the Old Siding
Work from the top down, using a pry bar to detach panels without gouging the sheathing beneath. Complete one full wall before moving to the next — never leave exposed sheathing overnight if rain is possible.
Once the old siding is off, inspect every inch of the sheathing for rot, mold, pest damage, and delamination. This is the single best opportunity to catch hidden damage. Contractors who skip this step are cutting corners at your expense.
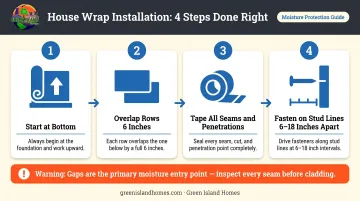
Step 2: Install the Weather-Resistant Barrier
House wrap (WRB) goes over repaired, dry sheathing before any siding touches the wall. It provides a secondary drainage plane — water that gets behind siding has somewhere to go rather than soaking into the structure.
Correct installation:
- Install horizontally, working bottom to top
- Overlap each row by at least 6 inches (per DuPont Tyvek guidelines)
- Tape all vertical seams and every penetration — windows, outlets, pipes — with flashing tape
- Space fasteners 6 to 18 inches apart on stud lines
Gaps in the WRB are the primary entry point for moisture damage. Every unsealed penetration is a potential leak path — none can be left to chance.
Step 3: Install Starter Strips, Flashing, and Corner Posts
The starter strip along the bottom of the wall sets the angle and alignment for every panel above it. If it's off by even a fraction, that error compounds with every row. Check it with a level across its entire length before fastening.
Key requirements for this phase:
- Install flashing around all windows, doors, and wall penetrations before surrounding panels go up
- Shingle flashing layers top over bottom — upper layers must always overlap lower ones
- Reverse shingling (upper layers underneath lower ones) directs water into the wall; it's one of the most common flashing errors contractors make
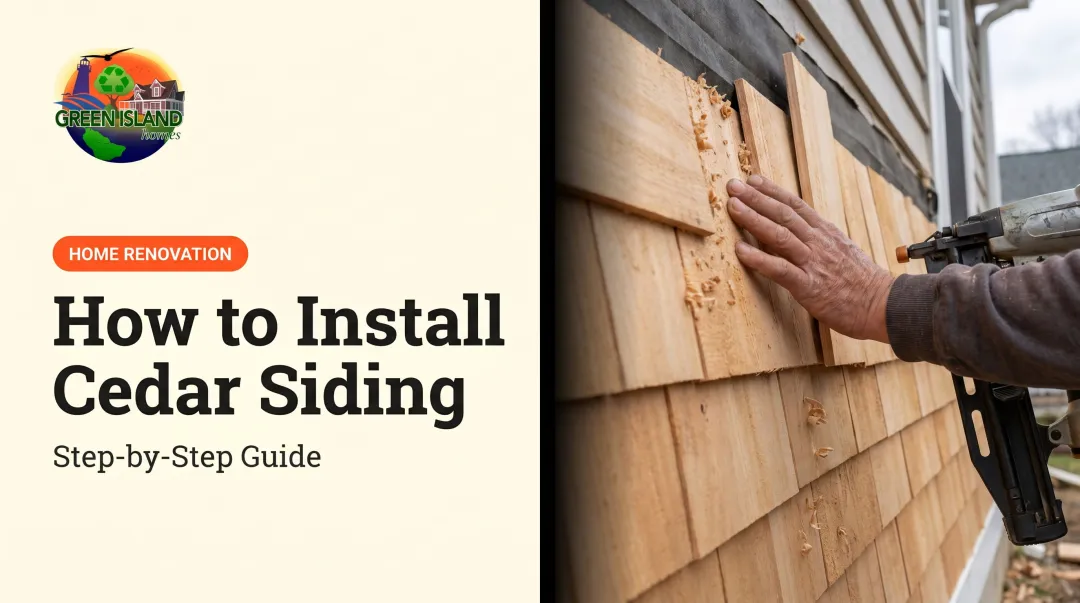
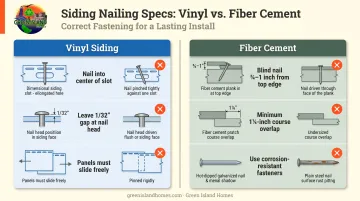
Step 4: Hang and Fasten the Siding Panels
Work bottom to top. The nailing technique is where most DIY installations go wrong.
For vinyl siding:
- Drive nails into the center of nail slots, not the edges
- Leave 1/32 inch between the nail head and the panel surface (Vinyl Siding Institute specification)
- The Vinyl Siding Institute confirms that tight nailing causes vinyl to buckle with temperature changes — vinyl can expand and contract ½ inch or more over a 12-foot-6-inch length
For fiber cement (HardiePlank):
- Blind nail ¾ inch to 1 inch from the top edge
- Minimum course overlap of 1¼ inches
- Use corrosion-resistant, galvanized, or stainless-steel fasteners
Check level with a chalk line every 3–5 rows. Drift is nearly invisible until it's several rows in and very obvious.
Step 5: Add Trim, Caulking, and Sealing
Trim boards, J-channels, and soffit connections go in last. Caulk at all joints where siding meets a dissimilar surface — windows, doors, trim boards.
One exception: Do not caulk where vinyl siding meets vinyl accessories. That junction needs to breathe and accommodate movement.
Cheap caulk shrinks and cracks within a few seasons. Use a paintable, flexible exterior-grade product rated specifically for your siding material.
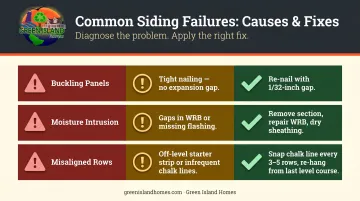
Common Siding Installation Problems and Fixes
Most siding failures trace back to the same small set of repeated mistakes. Catching them during installation costs nothing; fixing them afterward can mean tearing out entire sections.
Buckling or Warped Panels
Panels bow outward or ripple across the wall — most noticeable during hot weather. The cause is almost always nails driven too tightly through the nail slots, which prevents thermal expansion.
To fix it: remove the affected panels, re-nail with the correct 1/32-inch gap, and confirm each panel can slide slightly by hand before moving on.
Moisture Intrusion Behind the Siding
Warning signs include water staining on interior walls, soft spots in sheathing found months later, or a mold smell inside the home. Common causes:
- Gaps or improperly lapped WRB seams
- Missing flashing at penetrations
- Siding installed too close to grade
The affected section must come off so the WRB can be repaired or replaced and the sheathing dried out. There is no shortcut.
Misaligned or Uneven Panels
Horizontal rows that visibly drift out of level usually point to one of two causes: the starter strip was installed slightly off-level, or chalk lines weren't snapped often enough to catch gradual drift.
Snap a chalk line every 3–5 rows during installation. If the problem is caught late, remove affected rows back to the last confirmed level course and re-hang from there.
Pro Tips for a Successful Installation
Acclimation and Timing
- Allow fiber cement and engineered wood panels to acclimate on-site for the manufacturer's specified period before installation — installing cold or wet panels leads to post-installation movement
- Avoid installing vinyl in very cold weather; it becomes brittle and prone to cracking during cutting and fastening
Coastal Considerations
For homes near salt water — including Cape Cod and Martha's Vineyard — two things matter above standard installations:
- Fasteners: Use stainless steel wherever possible. Hot-dip galvanized meets minimum code requirements, but in salt air environments, corrosion degrades fasteners faster than most homeowners expect
- Finish selection: For fiber cement, James Hardie's factory-applied ColorPlus finish carries a 15-year warranty covering paint and labor, and is designed specifically for UV and weather resistance. For wood, primer-based paint systems with sealed end grain provide significantly longer service life than stains alone
When to Hire a Professional
Certain projects genuinely require a licensed contractor. Consider professional installation when:
- The home is two or more stories
- The exterior has dormers, bay windows, or multiple wall angles
- You're working with fiber cement (heavy, requires specialty cutting tools, and improper installation voids the 30-year James Hardie warranty)
- The sheathing requires significant repair before siding can begin
For homeowners on Cape Cod and Martha's Vineyard, finding a contractor familiar with coastal conditions matters as much as the materials themselves. Green Island Homes offers licensed siding installation, replacement, and repair across both regions. They're HomeAdvisor Screened & Approved, Top Rated, and Elite Service designated — and handle every phase of the project from initial assessment through final inspection.
Conclusion
A siding installation stands or falls on process discipline: the right sequence, a properly installed moisture barrier, precise fastening, and the patience to check level every few rows. Material choice sets the baseline — installation quality determines the outcome.
For straightforward single-story homes with uncomplicated exteriors, an experienced DIYer who follows manufacturer specifications closely can get good results with vinyl siding. For anything more complex — or for coastal homes where the margin for error is smaller — the cost of professional installation is almost always less than the cost of fixing what goes wrong.
That's especially true on Cape Cod and Martha's Vineyard, where salt air and weather exposure leave little room for shortcuts. If you want to know what siding replacement would involve for your specific home, reach out to Green Island Homes at 774-563-9714 or sales@greenislandhomes.com for an honest assessment and clear pricing.
Frequently Asked Questions
What is the average cost to put new siding on a house?
HomeAdvisor's 2025 data puts the national average at $11,583, with a typical range of $5,561 to $17,720. By material, installed costs run roughly $3–$12/sq. ft. for vinyl, $5–$14/sq. ft. for fiber cement, and $1–$6/sq. ft. for engineered wood. Labor rates in coastal markets like Cape Cod and Martha's Vineyard generally push costs above national averages.
Can you install wood siding over stucco?
A professional assessment is needed before going this route. Moisture trapped between stucco and new siding accelerates rot and structural damage, and the added wall thickness affects trim and window profiles throughout.
What color siding increases home value?
Neutral tones — warm whites, soft grays, and muted blues — have the broadest buyer appeal. The National Association of Realtors reports that 97% of NAR members believe curb appeal is important in attracting buyers, with more than half citing a well-maintained exterior as worth at least $20,000 in added resale value.
How long does it take to install new siding on a house?
A typical single-family home takes 7 to 14 days from start to finish. Variables include home size, material complexity, unexpected sheathing repairs, and weather delays — all of which are more common in coastal New England than the national average suggests.
Do I need to remove old siding before installing new siding?
Removal is strongly recommended, even when code allows installation over existing siding. It lets you inspect the sheathing for damage, ensures a flat nailing surface, and is required for proper WRB installation — all of which prevent premature failure of the new siding.
What is the best type of siding for coastal homes?
Fiber cement — particularly James Hardie's HZ10 line — handles salt air, humidity, and wind exposure better than most alternatives. Engineered wood with zinc borate treatment is a solid secondary choice. Natural wood can work but demands consistent maintenance to prevent paint failure in coastal conditions.