Fine Homebuilding describes cedar shingles as "the most labor-intensive siding choice" — and that assessment holds whether you're covering a single accent wall or a full exterior. When installation is rushed or sequenced incorrectly, the consequences are serious: water infiltration from misaligned flashing, premature decay from missing breathable membrane, and wavy courses that undermine curb appeal and may require complete re-installation.
This guide walks through the complete installation sequence, from wall prep through finishing — including the coastal-specific requirements that matter most for homes on Cape Cod and Martha's Vineyard.
Key Takeaways
- Installation follows seven sequential stages, from wall prep and moisture barrier through field courses, special areas, and final caulking
- Plan for 3–4 days minimum, two people, and proper scaffolding before starting
- Every shingle course requires triple coverage with joints staggered at least 1½" from adjacent courses
- Within 15 miles of saltwater, 316 stainless steel nails only — other fasteners will corrode and cause system failure
- Full exterior or complex projects in coastal climates are best left to a contractor experienced with saltwater construction requirements
What You'll Need Before You Begin
Wall and Substrate Requirements
Cedar shakes need a solid nailing base. The Cedar Shake and Shingle Bureau (CSSB) and APA both confirm that plywood, OSB, or dimensional lumber sheathing are acceptable substrates.
Rigid foam board is not. It lacks the nail-holding power required for secure fastening and should never be used as the sole sheathing layer beneath cedar siding.
Before any other work starts, inspect the existing sheathing for rot, soft spots, or delamination and repair anything that's compromised. You cannot correct sheathing problems after shingles are up.
Moisture Barrier and Flashing
This is where most DIY installations fail: not during shingle placement, but in the layers underneath.
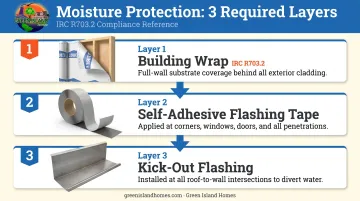
Required moisture protection, in order:
- Building wrap (Tyvek or comparable breathable membrane) over the full sheathing surface — IRC R703.2 requires this for all exterior wall coverings
- Self-adhesive flashing tape at every corner, window rough opening, door rough opening, and wall penetration before a single shingle goes up
- Kick-out flashing at all roof-wall intersections
The WRCLA specifies that the lowest edge of cedar siding must maintain at least 6 inches of clearance above grade to prevent moisture wicking. Where siding meets a roof or deck surface, maintain a 2-inch gap for the same reason.
Tools
- Chalk line and story pole (or swing stick)
- Level and measuring tape
- Staple gun or pneumatic siding nailer (rent one — hand-nailing anything beyond a single accent wall is impractical)
- Block plane or Surform tool
- Circular saw or table saw
- T-bevel for gable angle cuts
- Tin snips and utility knife
- Caulking gun
- Scaffolding or ladders appropriate for wall height
Materials
- Grade No. 1 Blue Label cedar shingles — 100% heartwood, 100% clear, 100% edge grain per CSSB standards — for all exposed faces (lower-grade shingles are acceptable for the hidden undercourse layer only)
- Exterior-grade caulk (avoid pure silicone or clear caulk on western red cedar per WRCLA guidance)
- Cedar trim boards, self-stick flashing tape, step flashing for roof-adjacent sections
To estimate quantity, calculate total wall square footage, subtract openings, then use CSSB/JLC exposure tables for your chosen shingle length and exposure to determine bundle count. Add roughly 5% for layout and cutting waste per JLC Field Guide guidance. Material suppliers can help confirm the final count.
The coastal fastener rule: For any installation within 15 miles of saltwater — which covers virtually all of Cape Cod and Martha's Vineyard — CSSB's wall manual specifies Type 316 stainless steel fasteners. Hot-dipped galvanized or 304 stainless will corrode in salt air, causing fastener failure and unsightly staining across the entire wall face. This is non-negotiable. Working with a local contractor like Green Island Homes means this requirement is built into the project specifications from the start.
How to Install Cedar Shake Siding: Step-by-Step
Installation follows a strict sequence. Skipping or reordering steps, especially the moisture barrier and layout stages, creates problems that won't surface until water damage has already occurred inside the wall.
Step 1: Prep Walls and Install Trim
With building wrap and flashing fully in place, install all exterior corner trim boards and window/door surround trim before any shingles go up. Shingles butt against these trim pieces. Installing trim after the shingles are up damages both components and is one of the most common sequencing errors on DIY projects.
The alternative is woven corners, where shingles from adjoining walls interlock at corners without trim boards. This technique requires both walls to be shingled simultaneously and demands far more planning and coordination than trim-based corners — skip it unless you've done it before.
Step 2: Lay Out Courses Using a Story Pole
A story pole transfers your shingle exposure intervals onto the wall before a single shingle goes up. Here's how to set it:
- Mark shingle exposure intervals on a long, narrow board from the bottom up
- Adjust marks so shingles land cleanly above and below every window and door opening — no narrow slivers at the top or bottom of any opening
- Transfer the marks to the wall by snapping chalk lines around the full perimeter at each course mark
- Re-snap or verify with a long level every 3–4 courses as installation progresses
Step 3: Install the Double Starter Course
The starter consists of two overlapping layers at the wall base:
- First layer: butt edge approximately 1" above the foundation or bottom plate
- Second layer: extends about ½" below the first layer, with its bottom edge maintaining the required 6-inch ground clearance
- Joints between the two layers must be offset by at least 1½"
Lower-grade shingles can be used for the hidden first layer. The second (outer) layer should be Grade No. 1.
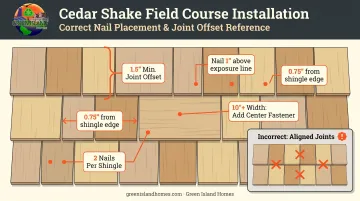
Step 4: Install Field Courses
This is the repeating process for every course up the wall:
- Set a ledger board or shingle jig at the chalk line to hold shingles at the correct exposure height
- Arrange shingles so no joint aligns with the course directly below (minimum 1½" offset) or the course two rows below — no three-course joint alignment anywhere on the wall
- Nail each shingle approximately 1 inch above the exposure line and ¾ inch from each edge using two nails per shingle
- For western red cedar shingles wider than 10 inches, add a center fastener or split the shingle — per CSSB guidance; for white cedar, the threshold is 8 inches per SBC specifications
Keep nailing consistent. Gun pressure set too high will overdrive nails and split cedar along the grain. Adjust until nails drive flush without indenting the surface.
Step 5: Handle Corners, Windows, Doors, and Gable Ends
These areas require the most time and the most cuts:
- Outside and inside corners: Notch-cut or plane shingles flush against the trim board; joints must sit at least 1" from the corner of any opening
- Above windows and doors (where no course underlies): Install a shim strip of matching shingle thickness to maintain the correct flare angle before setting the course
- Gable ends: Use a T-bevel to capture the roof angle, then cut a series of shingles to that angle before installing. Pre-cut in batches rather than fitting one at a time
- Rooflines: Install step flashing beneath each course before setting shingles; maintain a 2-inch gap between the siding and the roof or deck surface per WRCLA requirements
Post-Installation Checks and Finishing
Visual Inspection
Before finishing, sight down each course from one end of the wall:
- Butt lines should be straight and consistent — no waviness
- All corners should fit tight with no gaps wider than ¼"
- No three consecutive courses should share aligned joints anywhere on the wall
These are the most common visible defects that signal installation shortcuts.
Caulking and Sealing
Apply exterior-grade caulk at all trim joints: where shingles meet corner boards, window surrounds, and door casings. Do not caulk between individual shingles in the field.
Cedar relies on laps, keyways, and drainage to shed water naturally. As WRCLA warns, caulk applied between shingle gaps that isn't maintained can trap moisture and create the exact problem it was meant to prevent.
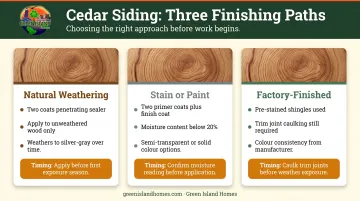
Once caulk is dry, the finishing sequence depends on your chosen look:
- Natural weathering: Two coats of penetrating sealer applied to unweathered wood — USDA Forest Products Laboratory research notes that finishes perform best on fresh, unweathered wood; even 2–3 weeks of sun exposure can reduce adhesion
- Stain or paint: Two coats of primer followed by finish coat; do not finish cedar above 20% moisture content
- Factory-finished shingles: Still require touch-up caulking at all trim joints
Unprotected end grain at cuts and trim joints is the primary moisture entry point — sealing it is non-negotiable, particularly in the high-humidity, salt-air conditions typical of Cape Cod and Martha's Vineyard.
Common Problems and Fixes
Uneven or Wavy Courses
Cause: Story pole layout wasn't accurately transferred to chalk lines, or the ledger board shifted during installation.
Fix: Re-snap chalk lines every 3–4 courses using a long level. Don't rely solely on story pole marks — verify level frequently as you work across each course.
Shingles Splitting During Nailing
Cause: Nail gun pressure too high, nails placed too close to the shingle edge, or nails too large in diameter for the shingle thickness.
Fix: Reduce nailer pressure; reposition nails at least ¾" from each edge; switch to the center-nail technique for wide shingles; use brad nails for corner pieces where splitting is most common.
Water Getting Behind the Siding
Cause: Missing or improperly lapped building wrap, flashing tape not applied at corners and rough openings before installation, or caulk omitted at trim joints.
Fix: Remove affected courses, correct the moisture barrier, and reinstall. This is the most expensive repair in cedar shake work — once shingles are up, there's no shortcut around a missing WRB.
Pro Tips for a Cleaner Installation
A few habits separate a clean, long-lasting installation from one that needs corrections halfway through:
- Build corners first: Work up all exterior and interior corners by 8–10 courses before filling in flat wall sections. Establishing the correct exposure rhythm at corners prevents costly adjustments across the full wall later.
- Store shingles properly: Keep them flat, elevated off concrete on their original pallet, in a ventilated but covered area. Install as soon as possible after delivery — moisture fluctuations during extended storage cause warping and pre-staining.
- Cut with grain direction in mind: Always cut so that any tendency to split sends the grain into the scrap piece, not the keeper.
- Know when to call a professional: Full home exteriors, dormers, complex roof-wall intersections, and multiple gable ends are all situations where professional execution pays off.
For Cape Cod and Martha's Vineyard homeowners, Green Island Homes — fully licensed, insured, and HomeAdvisor Top Rated — handles complete exterior siding projects with the regional knowledge to get coastal material requirements and moisture protection right.
Frequently Asked Questions
What is the difference between cedar shakes and cedar shingles?
Shakes are split from cedar logs, giving them a thicker, rougher, more textured face. Shingles are sawn on both faces, making them thinner, more uniform, and tapered. Both work as siding. The terms are often used interchangeably, but the products and their visual results differ noticeably up close.
How long does it take to install cedar shake siding?
A single wall of an average home takes 1–2 days with two people. A full exterior can take 1–2 weeks depending on complexity, with corners, dormers, and window transitions adding the most time.
What type of nails should I use for cedar shake siding near the coast?
316 stainless steel nails are required for any installation within 15 miles of saltwater. Hot-dipped galvanized and 304 stainless are acceptable for inland applications but will corrode and stain cedar in salt-air environments like Cape Cod and Martha's Vineyard.
How do I calculate how much cedar shake siding I need?
Measure total wall square footage, subtract window and door openings, then use CSSB or manufacturer exposure tables to convert square footage to bundle counts for your chosen shingle length. Add approximately 5% for layout and cutting waste. Your supplier can assist with the final calculation.
Can cedar shake siding be painted or stained?
Yes. Cedar can be left to weather naturally to silver-gray, sealed with a clear penetrating sealer, stained in semi-transparent or solid colors, or painted. Factory pre-stained and pre-primed shingles are available for a more consistent starting point, though all installations still need touch-up caulking at trim joints afterward.
How long does cedar shake siding last?
Well-installed cedar shake siding with quality materials, proper moisture control, and periodic maintenance typically lasts 25–40 years. Budget installations with inferior fasteners or no WRB can fail in under 15. Grade, exposure, finish, and ongoing upkeep are the primary variables.