The most important rule before anything else: composite boards cannot be laid directly on concrete. Every major manufacturer — Trex, Fiberon, TimberTech — requires a sleeper or subframe system to create drainage, airflow, and a proper fastening surface.
Three mistakes cause the majority of failed installations:
- Laying boards directly on the concrete surface
- Skipping a proper concrete condition assessment before starting
- Ignoring door clearance and stair height requirements
This guide walks through the complete, correct process — from slab assessment to final board placement.
Key Takeaways
- Composite decking over concrete requires a sleeper or subframe system — direct board-to-concrete contact is never acceptable
- Before anything else, inspect your slab for active settling, cracks, low spots, and drainage direction
- Work in order: correct the slope, install sleepers, then lay boards with manufacturer-specified gaps
- Three things to confirm upfront: slope drains away from the house, spacing matches install temperature, and door clearance allows for the added height
Before You Start: Assessing Your Concrete Patio
Skipping this step is the single most common reason a finished composite deck fails. A beautifully installed deck on a failing slab will sink, warp, or crack — no amount of quality boards or careful installation changes that outcome.
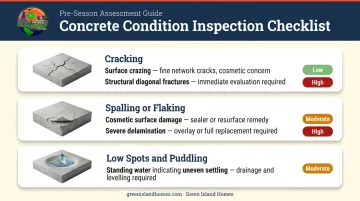
Concrete Condition Checks
Walk the entire slab and look for three things:
- Cracking — Surface crazing is usually cosmetic. Wide fractures, especially diagonal ones near corners, suggest soil movement beneath the slab. If cracks are actively widening, the slab is not a stable base.
- Spalling or flaking — Common in freeze-thaw climates like Cape Cod and Martha's Vineyard. Surface spalling alone doesn't disqualify the slab, but severe delamination may require a concrete overlay before sleepers go down.
- Low spots and puddling — Walk the patio after rain. Standing water indicates the slab has settled unevenly and will need correction before any framing.
If you suspect the slab is still moving, mark a reference line on the house foundation adjacent to the patio, measure to a corresponding mark on the slab, and recheck over two to three months. Do not install decking over a slab that hasn't stabilized.
Drainage and Door Clearance
Drainage slope: IRC R401.3 requires impervious surfaces within 10 feet of a foundation to slope at least 2% away from the building — roughly ¼ inch per foot. If water pools near the house, apply self-leveling compound to correct the slope before installing sleepers. Correcting slope after the subframe is anchored means tearing out the entire frame.
Door clearance test: Set a block of wood at the planned finished deck height — typically 2 to 3 inches above the existing concrete — in front of every door opening onto the patio. Open the door. If it doesn't clear, stop.
Stair height: If your patio has attached steps, raising the deck surface changes the top riser height — and riser uniformity is a life-safety requirement. Address any attached stairs before the project moves forward.
Under 2021 IRC R311.7.5.1, the maximum allowable variation between risers in a flight is 3/8 inch. Massachusetts further caps riser height at 8¼ inches under the 10th edition residential code.
Tools and Materials You'll Need
Tools Checklist
- Hammer drill — required for anchoring into concrete
- Cordless drill
- Circular or miter saw
- 4-foot level and long straight edge
- Chalk line reel
- Tape measure
Materials Checklist
- Pressure-treated lumber (2x4s) — must be ground-contact rated, UC4A or higher per AWPA standards
- Plastic or PVC shims
- Concrete screws (minimum 1-inch embedment into slab)
- Joist/deck flashing tape
- Self-leveling compound (if slab has low spots or incorrect slope)
- Composite decking boards
- Manufacturer-specified hidden fasteners or screws
A note on UC4A rating: standard above-ground lumber (UC3B) isn't rated for the moisture exposure that occurs between a sleeper and a concrete slab — ground-contact rating is the minimum here, not a suggestion.
A note on sleeper sizing: 2x2s are sometimes used, but quality can be inconsistent. Ripping 2x4s down the center gives you more reliable material with the same footprint.
How to Install Composite Decking Over a Concrete Patio
Installation follows a fixed sequence. Reordering steps — particularly shimming and leveling after anchoring — is the primary cause of bouncing boards, trapped water, and subframe rot.
Step 1: Level the Slab and Plan the Layout
If the concrete has low spots, apply a thin concrete overlay or self-leveling compound and allow full cure time before framing. Confirm drainage slope is correct at this stage.
Use 1-inch painter's tape to mark sleeper positions on the concrete before anchoring anything. Sleeper spacing must match your composite decking manufacturer's requirements — this varies by brand and board width, so check the specific product's installation guide before marking anything.
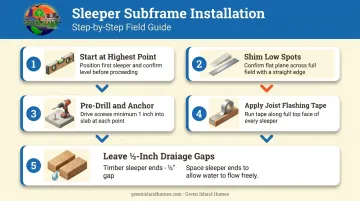
Step 2: Install the Sleeper Subframe
- Start at the highest point of the patio and position the first sleeper
- Shim low spots using plastic shims — use a straight edge across multiple sleepers to confirm you're building a single flat plane
- Pre-drill and anchor through shims and sleeper into the concrete; screws must penetrate at least 1 inch into the slab
- Run joist flashing tape along the full top face of each sleeper after anchoring to seal fastener holes and shed water
- Leave ½-inch gaps between sleeper ends for water movement — never butt ends tightly
Note: Fiberon requires sleepers on a flat, level solid surface. Concrete pavers, gravel, sand, and dirt are not suitable bases.
Step 3: Install the Composite Decking Boards
Start from the outer edge and work inward. Install accent (border) boards first — these set the reference lines for all field boards. Once borders are set, follow this sequence for field boards:
- Position each board and check spacing before fastening
- Use manufacturer-approved hidden fasteners or face-screw per brand specs
- Maintain consistent gaps throughout — deviations can void the warranty
Gapping is critical, not cosmetic. According to Trex's 2022 installation guide, follow these temperature-dependent specifications:
| Condition | Width-to-Width Gap | End-to-End Gap | Gap at Solid Objects |
|---|---|---|---|
| Above 40°F | 3/16 in | 1/8 in | 1/4 in |
| Below 40°F | 3/16 in | 3/16 in | 1/2 in |
Source: Trex 2022 Decking Installation Guide. Always confirm against your specific brand's current guide.
Boards installed in cooler weather need wider gaps — summer expansion has nowhere to go otherwise.
Common Installation Problems and Fixes
Most composite-over-concrete installation failures trace back to one of three root causes. Catching them early saves significant rework.
Water Pooling Under or Between Boards
Standing water under or between boards shortly after installation is almost always a slope problem — the concrete pitches toward the house instead of away, or low spots trap water beneath the sleepers.
- If caught mid-installation: Apply self-leveling compound to correct the slope before laying more boards
- If pooling is minor: Confirm all board gaps are clear of debris
- If the slope is severe after full installation: Get a professional assessment before the subframe deteriorates
Board Cupping, Bowing, or Fastener Stress
Boards that visibly bow or cup after one season — or fasteners that pull loose — point to a gapping error. Boards installed in cool weather with warm-weather gap sizing have no room to expand, so they push laterally against fasteners and adjacent boards.
During installation, follow the temperature-dependent gapping table above. If gaps were sized incorrectly, the boards may need to be pulled and re-spaced. Have a contractor assess any fasteners that show signs of stress or displacement before the problem spreads.
Door Clearance or Stair Height Violations Found After Installation
A door that no longer opens fully — or a top step riser noticeably taller than the rest — means the door clearance and stair height checks were skipped during the assessment phase. Both are code violations, not just cosmetic problems.
- Door clearance: A contractor can trim the door bottom or install a threshold transition
- Stair riser height: The framing above the affected step must be rebuilt to normalize riser heights — structural work that requires a licensed contractor
On Cape Cod and Martha's Vineyard, local building departments actively enforce riser height code. Don't leave this as a finish-later item.
Pro Tips for a Long-Lasting Installation
Account for Coastal Conditions
Salt air, high humidity, and freeze-thaw cycles on Cape Cod and Martha's Vineyard accelerate moisture damage to subframe lumber faster than most inland climates. Use ground-contact-rated pressure-treated lumber (UC4A minimum), apply joist tape to every beam, and consider composite or steel subframe systems for maximum longevity in marine environments.
Pull a Permit Before Starting
Deck permitting requirements vary by municipality and finished height. Both Edgartown and Falmouth treat deck construction as a permitted activity — Edgartown references it directly in its building scope, while Falmouth follows AWC deck guide standards. Confirm requirements with your local building department before any work begins. Installing without a required permit can complicate a future property sale.
Know When to Call a Professional
Some conditions push this project beyond DIY range:
- Active concrete settling or significant slab cracking
- Stair height corrections that affect existing structure
- Door clearance issues requiring framing work
- Subframe height that triggers permitting thresholds
Green Island Homes, a HomeAdvisor-screened contractor based in Edgartown, MA, handles composite deck installations across Cape Cod and Martha's Vineyard — from slab assessment through final board placement. Reach them at 774-563-9714 or sales@greenislandhomes.com.
Frequently Asked Questions
Can you put composite decking directly on concrete?
No. Fiberon and Trex both require a sleeper or subframe system to allow drainage, airflow, and proper fastening. Boards in direct contact with concrete trap moisture, deteriorate prematurely, and void manufacturer warranties.
How much does a 20x20 composite deck cost?
National data from Angi's 2026 report puts composite decking at $5–$18 per sq ft for materials and $10–$14 per sq ft for labor — roughly $6,000–$12,800 for a 400 sq ft area. Local rates on Cape Cod and Martha's Vineyard typically run higher than national averages, so get a local quote for accuracy.
Do I need a permit to install composite decking over a concrete patio?
Permit requirements vary by municipality and finished deck height. Towns across Cape Cod and Martha's Vineyard generally treat decks as permitted construction, but requirements differ town by town. Check with your local building department before starting — there is no universal exemption threshold in Massachusetts.
How do I prevent moisture buildup under composite decking on concrete?
Three steps: confirm the concrete slopes away from the house at ¼ inch per foot minimum, apply joist flashing tape to the full top face of every sleeper, and maintain manufacturer-specified board-to-board gaps so water drains through freely.
What type of sleepers should I use for composite decking over concrete?
Use ground-contact-rated pressure-treated lumber, UC4A or higher per AWPA standards. In coastal or high-moisture environments, composite or steel subframe systems offer greater longevity. Avoid standard above-ground treated lumber — low-clearance sleepers behave like ground-contact applications.
How long does it take to install composite decking over a concrete patio?
A small patio under 200 sq ft can typically be completed in a weekend by a capable DIYer. Larger areas — or those requiring concrete prep, stair corrections, or door clearance work — may take several weeks, with slab leveling often driving the timeline more than square footage alone.