The good news: most wood siding problems are fixable if you catch them early. Left alone, a small crack that costs a few dollars to patch can become a rotted board section requiring full replacement — and if the rot reaches the sheathing beneath, you're looking at a much larger project.
This guide covers how to spot damage early, repair cracks, holes, and rot correctly, decide when repair no longer makes sense, and protect your siding long-term.
Key Takeaways
- Wood siding commonly fails from moisture intrusion — showing up as cracks, soft spots, warped boards, and peeling paint
- Small cracks and holes can be patched with two-part epoxy filler; damaged boards require board-level replacement
- Prime all six sides of replacement boards, use stainless steel nails in coastal environments, and caulk every seam
- Repair when damage is isolated; replace when rot is widespread or boards can no longer hold fasteners
- Repaint every 4–5 years minimum — sooner in salt-air environments
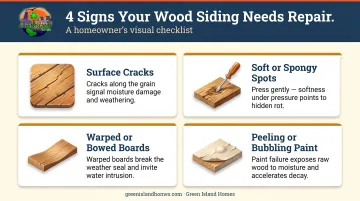
Common Signs Your Wood Siding Needs Repair
What to Look For on Your Walk-Around
Do a slow perimeter inspection twice a year — spring and fall. You're looking for four key warning signs:
- Surface cracks along the grain or across board faces — entry points for moisture that worsen with every freeze-thaw cycle
- Soft or spongy spots — press a screwdriver tip firmly into suspicious areas; if it sinks in without resistance, rot is already present
- Warped or bowed boards pulling away from the wall — these gaps let water behind the siding and hold it there
- Peeling, bubbling, or flaking paint — not just a cosmetic issue; it means moisture has already breached the surface seal
Why Coastal Homes Age Faster
On Cape Cod and Martha's Vineyard, these problems don't develop slowly. Salt air corrodes nails and fasteners. High humidity keeps wood damp between rain events, and New England's freeze-thaw cycles cause wood to expand and contract repeatedly — widening small cracks into large ones over a single winter.
Moisture fluctuations cause checking, warping, paint failure, and rot. UV exposure makes it worse by breaking down lignin — the binding agent in wood cells — accelerating surface erosion and cracking even on boards that look structurally sound.
Catching damage in the crack stage costs a fraction of what it costs once rot sets in. According to HomeGuide, minor patching runs $200–$800, while major rot and structural work runs $3,000–$10,000 or more.
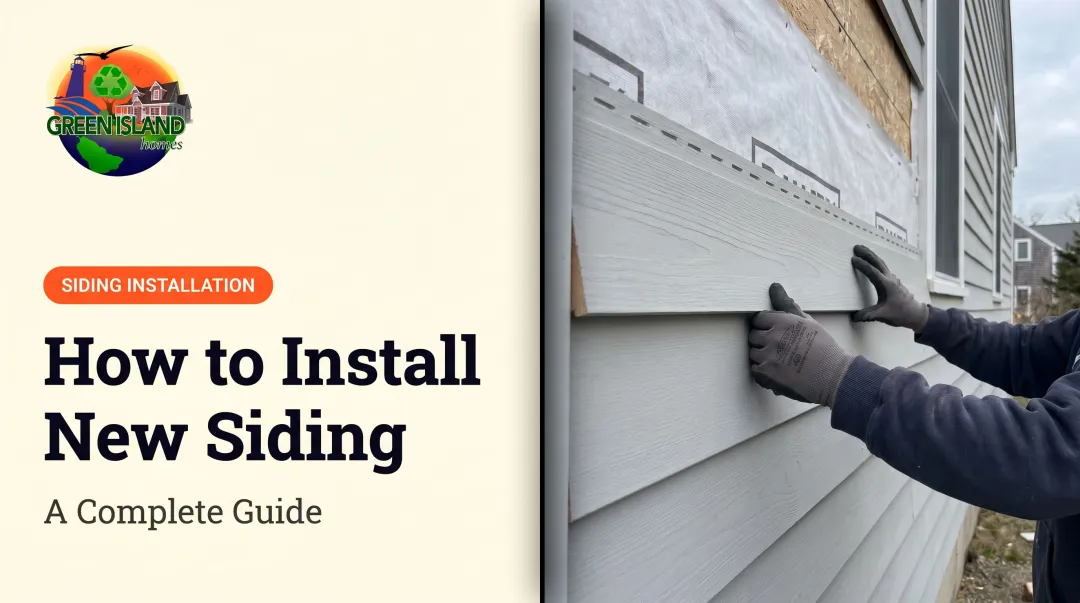
How to Repair Wood Siding
The right repair depends entirely on the type and severity of damage. Using a surface patch on a structurally compromised board won't hold. Filling rot without removing all the decayed material guarantees the problem returns.
Patching Small Holes and Cracks
For minor surface damage (small holes from fasteners, cracks less than a quarter-inch wide, localized chips), follow this process:
- Clean the area with a wire brush to remove loose debris, paint flakes, and any soft material
- Back-fill cracks with paintable acrylic latex caulk before applying filler — this adds a moisture barrier at the gap itself, which matters in high-humidity coastal climates
- Apply two-part exterior epoxy wood filler into the crack or hole, slightly overfilling the cavity
- Let it cure fully, then sand flush with the surrounding surface
- Prime and paint the repaired area with exterior-grade products to seal against moisture
Two-part epoxy systems cure harder than wood and stay flexible enough to handle seasonal expansion and contraction. Single-part spackling and basic wood filler can't deliver both of those qualities outdoors.
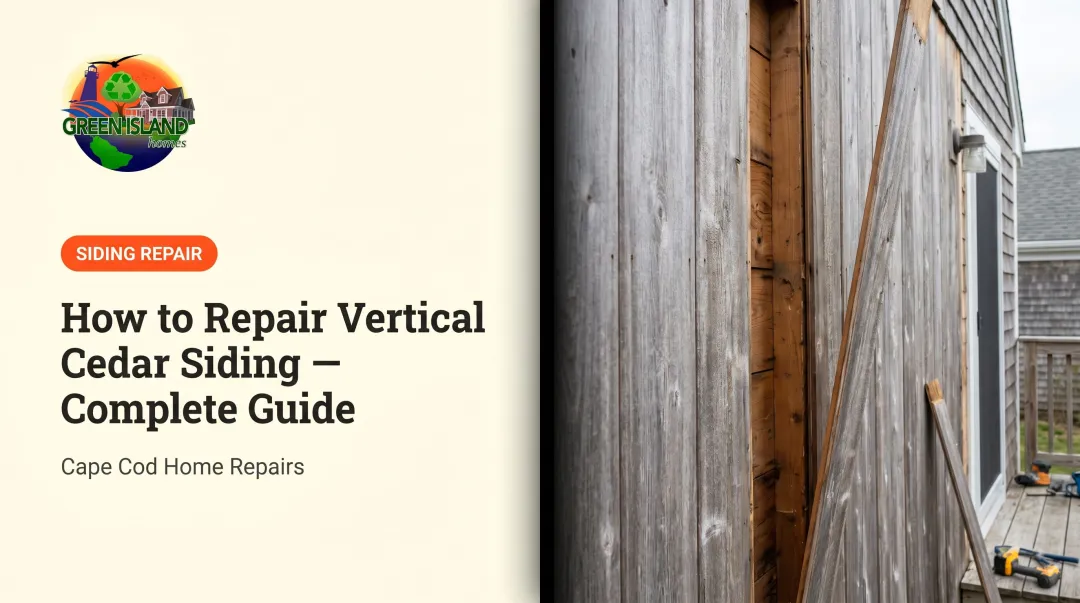
Replacing a Damaged Board Section
When a board is cracked through its depth, has failed along its length, or is too warped to lay flat, replacement is the right call:
- Score the caulk around the damaged section with a utility knife
- Make clean vertical cuts on each side of the damaged area using an oscillating multi-tool — cut through siding only, not the sheathing beneath
- Pry the section loose carefully with a pry bar
- Match the clapboard profile at a lumber yard before cutting the replacement piece to length
- Prime all six sides of the new board before installation — front, back, top, bottom, and both ends. The Western Red Cedar Lumber Association recommends coating all surfaces including ends and edges for optimum performance
- Back-caulk the edges where the new piece meets existing siding
- Fasten with ring-shank stainless steel nails — for seacoast exposures, No. 316 stainless is the right spec; it won't rust-stain the siding the way galvanized nails eventually do
- Set nail heads below the surface, fill with wood filler, prime, and paint
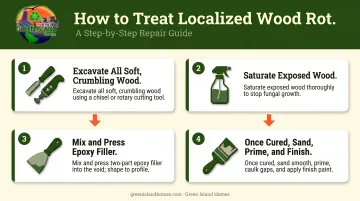
Treating Rot with Epoxy
For rot that is localized and hasn't reached the structural framing behind the siding:
- Remove all decayed material with a rotary tool or trim router — grind down to solid wood. Epoxy will not bond to soft or crumbly fibers
- Inject a borate-based wood preservative into the surrounding area to stop further fungal activity before patching
- Mix the two-part epoxy filler per manufacturer instructions and press it into the cavity with a putty knife — a cut piece of plastic putty knife can be shaped to match the surrounding profile
- Let it cure completely, sand smooth, apply exterior primer, caulk all edges, and paint
A consolidant-plus-filler system (such as LiquidWood followed by WoodEpox) is a reliable approach for rot repairs. The consolidant penetrates and hardens remaining porous fibers before the filler is applied. Use it on any rot repair larger than a knot hole.
When to Repair vs. Replace Your Wood Siding
The Core Decision
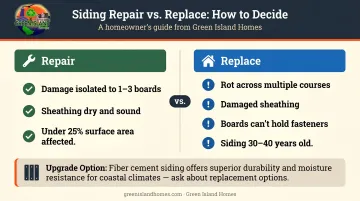
Repair makes sense when:
- Damage is isolated to one to three boards
- The sheathing and framing behind the siding are dry and structurally sound
- The wood can be returned to a weathertight condition with filler or board-level replacement
Replacement is the better call when:
- Rot has spread across multiple courses of siding
- The sheathing beneath is soft or shows signs of moisture damage
- Boards are so warped or loose they can no longer hold fasteners
- Damage affects more than roughly 25% of the siding surface
HomeGuide's repair guidance supports this threshold: siding repair is generally the right approach when damage is under 25% of the total area and the siding hasn't reached the end of its expected 20–40 year lifespan.
The Age Factor
Siding that is 30–40 years old with multiple past repairs and widespread paint failure is usually a better candidate for full replacement. Ongoing patch repairs on aging siding hit a point of diminishing return — each fix buys less time than the last.
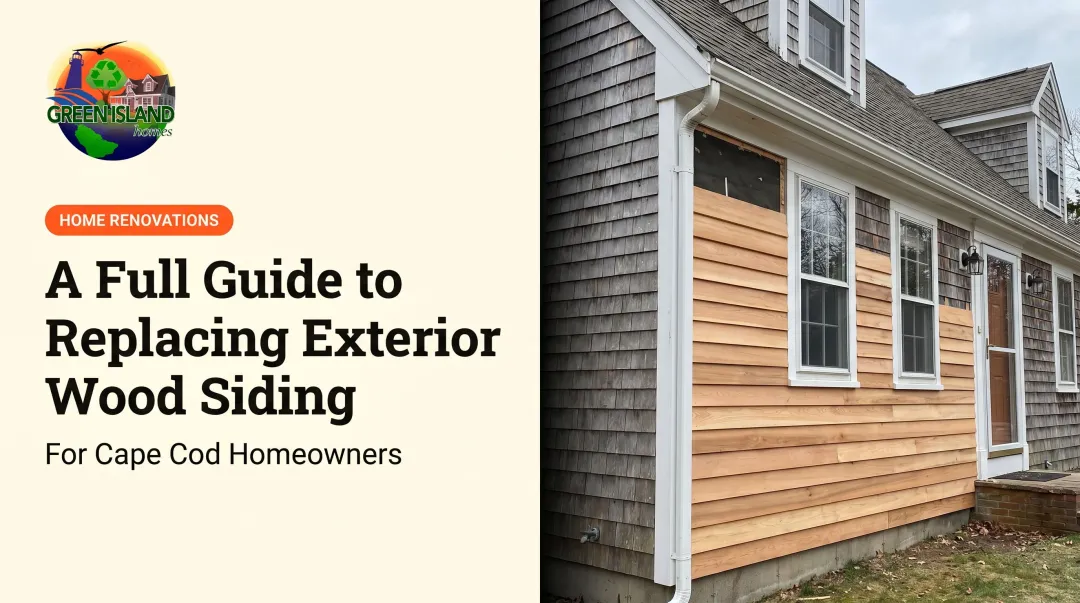
Replacement also opens the door to a material upgrade. Fiber cement siding, for example, resists moisture, insects, and rot more effectively than natural wood while maintaining a similar appearance. The 2025 JLC Cost vs. Value Report puts fiber cement siding replacement at an average resale value addition of $24,420. For Cape Cod and Martha's Vineyard homeowners, where property values run high, that's a meaningful return on the investment.
Get a Professional Assessment First
For extensive or multi-story siding damage, a licensed contractor should assess the full scope before any work begins. Surface inspections miss what's happening behind the boards — compromised sheathing, wet framing, or mold growth that dramatically changes the scope and cost of a project.
Green Island Homes provides siding installation, replacement, and repair services across Cape Cod and Martha's Vineyard as a fully licensed, insured, and HomeAdvisor-approved contractor. For an estimate or to discuss whether your siding needs repair or replacement, contact them at 774-563-9714 or sales@greenislandhomes.com.
How to Protect Your Wood Siding After Repair
Paint and Seal — The Full System
After any repair, don't just spot-prime the patched area. The entire board should be primed and painted to ensure consistent moisture protection.
The USDA Forest Products Laboratory puts a standard one-primer-plus-one-topcoat system at 4–5 years of service life. Adding a second topcoat can extend that to up to 10 years.
In coastal environments with salt air and high UV exposure, lean toward the shorter end of that range. For homes directly exposed to ocean conditions on Cape Cod or the Vineyard, 3–4 years is a realistic repaint cycle.
Caulk Maintenance
Annual caulk inspection is the single most effective habit for preventing moisture intrusion. Every spring, check:
- All horizontal seams and laps between siding courses
- Corners, window and door trim edges
- Any area where two materials meet
Gaps or dried-out caulk at these joints are direct water pathways. Paintable acrylic latex caulk works well for most exterior wood siding: apply only when temperatures are between 40°F and 100°F, and not within 24 hours of forecasted rain or freezing temperatures.
Inspection and Drainage Habits
A twice-yearly walk-around — spring and fall — catches most problems before they become expensive. While you're at it:
- Check that gutters and downspouts are directing water well away from the foundation, not splashing back onto the lower courses of siding
- Look for standing water near the foundation after heavy rain
- Check that the bottom course of siding maintains clearance from the soil — USDA FPL recommends at least 8 inches above the outside groundline
Keep Vegetation Clear
Shrubs, vines, and mulch beds pressed against siding trap moisture and accelerate decay. Two habits make a real difference here:
- Keep a clear gap between plants or mulch and the bottom course of siding
- Trim back any vegetation growing directly against the wall each season
NC State Extension research also links direct wood-to-soil contact — including mulch against siding — to subterranean termite activity, compounding the moisture risk with pest exposure.
Frequently Asked Questions
Can you repair wood siding?
Yes — in most cases, wood siding can be repaired without replacing the entire wall. Cracks and holes patch well with exterior epoxy filler, and individual boards can be swapped out without disturbing adjacent sections, as long as the sheathing and framing behind the damage are dry and structurally sound.
How much does wood siding repair cost?
Minor patching and filling typically runs $200–$800; moderate board replacement work ranges from $800–$3,000; major rot or structural repairs can reach $3,000–$10,000 or more. On Cape Cod and Martha's Vineyard, expect pricing above national averages due to island logistics, coastal labor rates, and the frequency of hidden sheathing damage in older homes.
How do I know if wood siding rot is serious?
Rot is serious when the screwdriver probe test reveals soft wood across a large area, when multiple adjacent boards are affected, or when the rot has extended beyond the siding into the sheathing or structural framing beneath. Any of those scenarios calls for a professional assessment before committing to repair.
What is the best product to fill holes in wood siding?
Two-part exterior epoxy wood filler is the most durable option — it cures harder than wood, stays flexible through seasonal movement, and bonds reliably to damaged surfaces. For rot repair specifically, a consolidant-plus-filler system like LiquidWood and WoodEpox gives the best results.
How often should wood siding be repainted or resealed?
A standard primer-plus-one-topcoat system lasts 4–5 years; two topcoats can push that to 10 years. In salt-air environments like Cape Cod and Martha's Vineyard, plan on repainting every 3–4 years and watch for peeling as the first sign of trouble.