Introduction
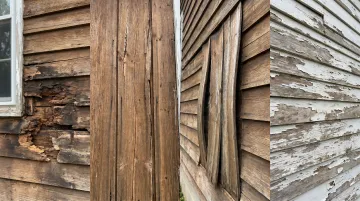
Replacing exterior wood siding is more involved than it looks. Strip away the old boards and you may find compromised sheathing, failed moisture barriers, or rot that has crept into wall framing — problems that started long before the surface showed any signs of trouble.
In coastal environments like Cape Cod and Martha's Vineyard, the stakes are higher. Salt air, humidity, and seasonal freeze-thaw cycles accelerate wear in ways that inland projects simply don't encounter. Techniques and materials that work fine in a drier climate can fail within a few years here.
Replacing one or two boards is manageable for an experienced DIYer. Anything beyond that — full wall sections, sheathing repairs, work near window framing — typically warrants a licensed, insured contractor. Cutting corners carries real consequences:
- Moisture intrusion into wall cavities
- Rust streaking from incorrect fasteners
- Rot spreading to structural framing
- Boards that fail within years of installation
This guide walks through the complete process — from initial assessment and material selection through installation and finishing — with specific attention to what coastal conditions demand at each step.
Key Takeaways
- Replace (don't patch) when rot spans multiple courses, sheathing is soft, or moisture intrusion is persistent
- Always remove the old moisture barrier completely before installing new boards; nail holes make it unreliable
- Use stainless steel or hot-dipped galvanized ring-shank nails only — standard steel corrodes and streaks, especially near salt air
- Install from the bottom up, maintaining proper course overlap and leaving expansion gaps at butt joints
- Full-wall or whole-house replacement requires a licensed contractor
Signs Your Exterior Wood Siding Needs Replacing (Not Just Repairing)
The repair-vs-replace decision comes down to how far the damage has spread. Replacing an isolated board or two makes sense when the surrounding structure is sound. But when damage extends across multiple courses — or when the sheathing underneath shows signs of long-term moisture exposure — repair becomes an expensive delay, not a solution.
Damage Indicators Worth Inspecting
Walk the perimeter and look for:
- Soft spots — press a screwdriver firmly into suspicious areas; healthy wood resists, rotted wood yields
- Warping or bowing boards that have pulled away from the wall plane
- Cracked or split boards that have allowed water behind the cladding
- Extensively peeling or faded finish that has lost its protective function
- Mold or discoloration patterns indicating prolonged moisture exposure, not just surface dirt
The USDA Forest Products Laboratory notes that wood at 20% moisture content or less is generally safe from fungal damage, while serious decay begins above the fibre saturation point of approximately 30%. A moisture meter reading on suspect boards gives you actual data rather than guesswork.
If those readings run high, pull a few sample boards and inspect the sheathing beneath. Soft spots, discoloration, or mold growth there confirm that replacement is the right call. Deferring it means rot spreads deeper into wall framing — a structural repair that costs significantly more than new siding.
Green Island Homes offers siding assessments for Cape Cod and Martha's Vineyard homeowners who want a professional read on whether partial repair or full replacement is the more cost-effective path.
Tools, Materials, and Choosing the Right Wood
Tools Required
- Pry bar and oscillating multi-tool with wood-cutting blade (preferred over a circular saw for precision cuts near adjacent boards)
- Circular saw, nail gun or hammer, speed square
- 6' level and tape measure
- Utility knife and caulking gun
- Extension ladder for upper courses
- Safety glasses and hearing protection
Materials Checklist
- Replacement siding boards (order with a 10% waste allowance)
- New house wrap or moisture barrier
- Stainless steel or hot-dipped galvanized ring-shank nails
- Exterior-grade paintable caulk
- Wood primer and exterior paint or stain
- Flashing for windows and door openings
Fastener choice matters more than most homeowners expect. IRC R703.3.3 requires corrosion-resistant fasteners for exterior wall coverings — aluminum, galvanized, stainless steel, or rust-preventative coated.
The USDA FPL notes that deformed-shank (ring or spiral) nails can provide up to 4 times the withdrawal resistance of smooth common nails under moisture cycling. In a coastal environment like Cape Cod or Martha's Vineyard, stainless steel ring-shank nails are the non-negotiable choice.
Wood Species Comparison
| Species | Decay Resistance | Best For |
|---|---|---|
| Western red cedar | Very resistant (USDA FPL) | Most coastal applications; holds paint and stain well |
| Redwood | Very resistant (USDA FPL) | Premium alternative; similar durability to cedar |
| Engineered wood | Varies by product | Greater dimensional stability; reduced maintenance |
| Thermally modified wood | Improved stability; less moisture uptake | High-humidity and coastal climates |
| Pine / spruce / fir | Slightly or non-resistant (USDA FPL) | Not recommended without treatment and rigorous maintenance |

For Cape Cod and Martha's Vineyard properties, cedar and thermally modified wood are well-suited to the salt air and humidity — both hold up reliably where pine and spruce struggle.
Species selection also shapes your long-term maintenance schedule. The USDA FPL's verified finish intervals offer a useful benchmark: a three-coat paint system can last more than 10 years, while semitransparent penetrating stain on smooth wood typically needs refreshing every 2 to 4 years.
How to Replace Exterior Wood Siding: Step-by-Step
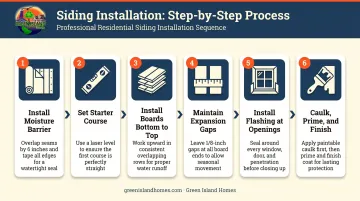
Siding replacement follows a fixed sequence: preparation → removal → substrate repair → moisture barrier → board installation → finishing. Skipping substrate inspection or moisture barrier replacement is the most common reason the same problems recur within a few years.
Prerequisites and Preparation
Before ordering materials or touching a board:
- Measure wall surfaces — width × height, subtract window and door areas, add 10% for waste
- Confirm a dry-weather window — exposed sheathing cannot get wet during the process; plan for several consecutive dry days
- **Resolve any active leaks or roof issues** — new siding will not fix water entering from above
- Verify flashing around windows and roof joints is intact or plan for replacement
Massachusetts 780 CMR Chapter 7 requires a weather-resistant exterior wall envelope, a weather-resistant barrier (WRB), and flashing at openings. Check with your local building department about permit requirements before starting.
Removing Old Siding and Prepping the Substrate
- Use wooden shims to lift the course above the damaged section before cutting or pulling nails
- Work top-down when removing multiple courses; protect adjacent boards with scrap plywood while prying
- Remove the old moisture barrier entirely — nail holes and tears from the previous installation make it unreliable
- Press for soft spots across all exposed sheathing; check for discoloration indicating moisture damage
- Replace any compromised plywood before continuing — use pressure-treated or exterior-rated sheathing
- If studs show rot, stop work and contact a licensed contractor before proceeding
The USDA Forest Products Laboratory identifies approximately 12% MC as the target service moisture content for exterior siding. Use a moisture meter to confirm the wall cavity has dried adequately — don't just count calendar days.
Installing the New Siding
Moisture barrier and starter course:
- Install new house wrap from the bottom up, overlapping each row by at least 2 inches so any penetrating water runs down and out
- Secure with galvanized roofing nails
- Cut the starter plank (trim the groove edge for a clean outward-facing bottom), then use a level to establish a straight reference line before nailing
Board installation:
- Work bottom to top, fitting each tongue into the preceding groove and blind-nailing through the tongue into studs
- Maintain at least a 1-inch overlap between courses
- Leave a 1/8-inch gap at butt joints and corners for expansion
- Check alignment with a level every few courses — drift compounds quickly
Edges, openings, and finishing:
- Miter-cut corners for a clean finish
- Install flashing over and around all window and door openings before fitting boards against them
- Maintain a 1-inch gap where siding meets roof shingles
- Industry installation standards call for at least 1/4-inch clearance above flashing and a minimum 6-inch gap above grade
- Caulk all seams and joints with exterior-grade caulk; prime all exposed surfaces including end cuts; finish with exterior paint or stain
Follow this sequence carefully and each phase builds cleanly on the last. Cut corners on substrate prep or moisture barrier installation and you'll likely be back here doing it again in three to five years.
Common Problems During Siding Replacement
Rot or Moisture Damage Found Behind Old Siding
Problem: Sheathing panels are soft, discolored, or show mould growth after old cladding is removed.
Likely cause: The old moisture barrier failed — inadequate overlap, missing flashing, or simple age — allowing water to accumulate in the wall cavity over years.
Fix: Replace all compromised sheathing before installing the new barrier. Allow the wall cavity to dry until moisture meter readings confirm the cavity is at or below 20% MC before closing it up.
New Boards Warping or Cupping After Installation
Problem: Newly installed boards bow, cup, or twist within weeks.
Likely cause: Wood was not acclimated to local conditions before installation, or the moisture barrier is trapping moisture behind the boards. The Building Science Corporation notes that wood siding gains thickness with wetting and shrinks with drying — moisture cycling directly stresses boards and paint films.
Fix: Acclimate replacement boards on-site for at least 48 hours before cutting and nailing. Prime all four sides before installation, including the back face and end cuts. Confirm the moisture barrier has no gaps or laps running the wrong direction.
Rust Streaking on New Siding
Problem: Brown or orange stains run down from nail locations on newly installed siding.
Likely cause: Standard steel or zinc-plated nails were used. On Cape Cod and Martha's Vineyard, salt air accelerates corrosion faster than most homeowners expect. The staining is a symptom; the corroding fastener behind it is the actual problem, and it worsens each season.
Fix: Remove and replace all incorrectly specified fasteners. Use only stainless steel or hot-dipped galvanised ring-shank nails for all exterior wood siding work.
Pro Tips for a Long-Lasting Wood Siding Replacement
Timing and Priming
- Schedule installation during dry, mild weather — avoid freezing temperatures or high humidity
- Prime all four sides of every board before installation, not just the face; unsealed end cuts and backs are the primary moisture entry points
- Miter-cut board bottoms at a slight angle to encourage water to drip away rather than wick back into the wall
Coastal Climate Specifics
Homes on Cape Cod and Martha's Vineyard face salt air, high humidity, and freeze-thaw cycling that accelerates wear well beyond typical inland rates. Practical steps that matter here:
- Choose breathable exterior coatings specifically rated for marine or coastal use
- Plan for annual inspections rather than the standard 3-5 year cycle
- Pay close attention to caulking around windows and at the base of siding where water tends to pool
- Inspect and re-caulk any cracked joints before each winter
These conditions require more than standard installation practice. Green Island Homes works specifically in this environment, handling siding projects with the material choices and installation sequencing that Cape Cod and Martha's Vineyard demand.
Know When to Call a Licensed Contractor
Replacing one or two boards is within reach for a capable DIYer. Beyond that, the risk profile changes. Stop and call a professional when:
- The project covers multiple walls or the full house
- Exposed sheathing or studs show rot or structural damage
- Scaffolding is required for safe access
- Rot is found near window framing or roof joints
- You are unsure about permit requirements under Massachusetts 780 CMR
A licensed, insured contractor won't just replace boards — they'll identify what caused the failure in the first place, whether that's flashing, moisture infiltration, or inadequate sheathing, and fix it before it repeats.
Frequently Asked Questions
How much does it cost to replace exterior wood siding?
HomeAdvisor's 2026 siding cost guide reports siding typically runs around $12 per square foot installed, with wood starting lower depending on species and scope. Coastal markets like Cape Cod and Martha's Vineyard carry labor and material premiums — contact a local contractor for an accurate project estimate.
Will homeowners insurance cover rotted siding?
According to the Insurance Information Institute, standard homeowners policies do not cover routine wear and tear or gradual deterioration. Storm damage or other sudden, covered perils are a different question — review your specific policy and consult your insurer directly.
How long does exterior wood siding last?
Lifespan depends on species, climate, and maintenance. Cedar and redwood heartwood are classified as very resistant to decay by the USDA FPL. A three-coat paint system can last more than 10 years; penetrating stains need refreshing every 2 to 4 years.
What is the best wood species for exterior siding?
Cedar is the most practical choice for most homeowners — naturally rot- and insect-resistant, workable, and widely available. Redwood matches cedar's durability at a higher price. Engineered wood cuts maintenance demands but lacks the natural decay resistance of either.
Can you replace just a few boards without replacing all of it?
Yes — partial replacement is straightforward when damage is isolated. The key challenge is matching new boards to the existing siding in thickness, profile, and finish. A close visual match matters, particularly on the front elevation.
How long does a full siding replacement take?
A professional crew typically completes a full replacement on an average-sized home in several days to a week, with substrate repairs and weather delays extending that timeline. DIY timelines run considerably longer. Contact Green Island Homes at 774-563-9714 for a project-specific estimate.