This guide walks you through identifying where a cedar shake roof is actually leaking, completing a step-by-step DIY repair, avoiding the mistakes that make things worse, and recognizing when a repair isn't enough and a full replacement makes more sense.
Key Takeaways
- Cedar shake roofs most commonly leak from cracked or missing shakes, failed underlayment, or deteriorated flashing at chimneys, vents, and valleys
- Minor, isolated leaks are reasonable DIY projects on roofs under 15–20 years old with shakes still firm enough to walk on
- Repair process: find the leak from the attic, replace damaged shakes using blind nailing, inspect flashing, and test with a hose
- If damage is widespread, the roof is sagging, or leaks keep recurring, replacement is the smarter call
Why Cedar Shake Roofs Leak: Causes and Warning Signs
What Causes the Damage
Cedar shake roofs fail for a handful of predictable reasons:
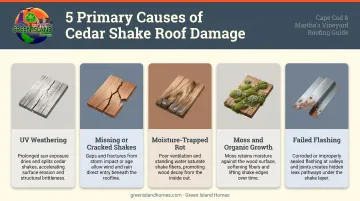
- UV weathering – Sunlight degrades the wood surface over time; repeated wetting and drying causes cracks, splits, cupping, and warping
- Missing or cracked shakes – Wind, storm impact, and brittleness from age can dislodge or fracture individual shakes
- Moisture-trapped rot – Debris like leaves and pine needles holds moisture against the wood; the Cedar Shake & Shingle Bureau (CSSB) warns that blocked keyways prevent cedar from breathing and drying
- Moss and organic growth – Biological buildup forces water under shakes and holds it there
- Failed flashing – Metal strips at chimneys, skylights, vents, and valley seams corrode or lift, letting water in at the most vulnerable joints
Salt air accelerates all of this. CSSB requires Type 316 stainless steel fasteners on roofs within 15 miles of salt water—standard galvanized nails corrode faster in coastal environments and can fail entirely, letting shakes work loose long before their time.
Warning Signs to Look For
Check both inside and outside the home:
From the attic:
- Water stains or wet insulation on rafters
- Visible daylight through the roof deck
- Soft or dark-stained wood along rafter lines
From the exterior (ground level or ladder):
- Visibly missing, curled, or buckled shakes
- Dark streaks or moss patches on the roof surface
- Peeling, lifted, or rusted flashing
Where water appears on your ceiling is rarely where it entered the roof. Water travels along rafters before dripping. Always trace the water trail in the attic back toward the ridge before climbing up.
How to Fix a Cedar Shake Roof Leak: Step-by-Step
Skipping straight to the roof without first locating the true leak source is the most common DIY error. Work methodically—the five steps below are sequenced for a reason.
Step 1: Safety Setup and Locating the Leak
Before you touch a ladder, gather:
- Sturdy extension ladder
- Non-slip footwear
- A spotter to hold the ladder base
- A flashlight for attic inspection
Weather matters. Never work on a wet roof, in high wind, or during extreme heat.
Also keep the roof's age in mind before walking on it. On roofs older than 15–20 years, cedar shakes can be brittle enough that foot traffic causes more damage than the original leak. Use roof jacks or position your weight over rafters when possible.
Start the inspection from inside the attic with your flashlight. Look for stained rafters, wet insulation, or any spot where daylight is visible. Mark the approximate location. Then, from the ground with binoculars, scan for obvious damage—missing shakes, dark patches, or displaced flashing—before committing to full roof access.
Step 2: Lift Affected Shakes and Inspect the Underlayment
Once you've identified the suspect area, carefully insert a flat pry bar under the shakes surrounding it. Lift slowly and prop each shake with a wooden shim—cedar splits easily when dry, and forcing it will create new damage.
What to look for in the exposed underlayment (roofing felt):
- Dark staining or soft, deteriorated material
- Actual tears or holes in the felt
- Evidence of pooling water
If the felt is intact, the underlayment may still be shedding water adequately—look toward flashing instead.
If the felt is compromised, cut out the damaged section with a utility knife and patch with new waterproof underlayment. Per CSSB installation requirements, interlayment strips should be 18-inch-wide No. 30 felt (ASTM D226 Type II or ASTM D4869 Type IV), with the lower edge positioned above the shake butt by twice the weather exposure distance.
Step 3: Replace Damaged Shakes Using the Blind Nailing Technique
Remove the damaged shake by scoring it with a utility knife, then splitting it into smaller pieces with a chisel if needed. Slide the pieces out carefully. New replacement shakes should match the original in width, thickness, and exposure length—use the same species and grade to ensure consistent weathering.
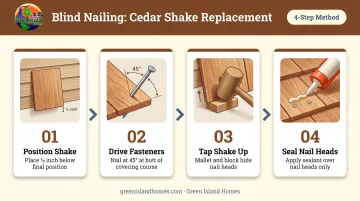
The blind nailing method (per CSSB guidance):
- Slide the new shake into position, holding it ½ inch below its final resting spot
- Drive two fasteners at a 45-degree angle at the butt of the covering course above
- Use a wood block and mallet to tap the shake upward the remaining ½ inch, hiding the nail heads under the overlapping course
- Apply a small amount of roofing sealant over nail heads only—never spread sealant broadly across bare cedar
For coastal properties within 15 miles of salt water, CSSB specifies Type 316 stainless steel fasteners. Standard galvanized nails will corrode in salt air environments.
If full replacement isn't immediately practical: slide a sheet metal patch (slightly larger than the damaged area, with crimped edges) beneath the affected shake over the leak point. Secure with roofing nails and tape along seams. This extends waterproofing temporarily—plan full replacement within one season.
Step 4: Check and Repair Flashing at Vulnerable Points
Flashing failures are frequently missed in DIY repairs, but they're one of the most common leak sources on cedar shake roofs. Check all metal strips at:
- Chimney bases and sides
- Skylight perimeters
- Plumbing and exhaust vents
- Valley seams where two roof planes meet
Small lifted sections can be re-secured with roofing nails and sealed with roofing caulk. Note that caulk works on metal flashing and finished surfaces only—CSSB is explicit that caulk will not adhere properly to unfinished cedar wood and is only a temporary fix when applied directly to wood.
If flashing is severely corroded or has failed along a long seam, professional replacement is the right call. A roofing contractor will remove the old flashing, reset it with proper step or counter-flashing profiles, and seal it correctly—stopping the cycle of recurring leaks.
Step 5: Test the Repair
Lower all lifted shakes back to their original positions and nail them carefully, checking alignment so water flows down and off rather than collecting between courses.
The hose test:
- Post a helper at the previously leaking interior spot
- Run a garden hose over the repaired area for several minutes, starting below the suspected entry point and working upward
- If no water appears inside, the repair held—if water persists, the entry point is elsewhere and Step 1 needs repeating
Common Mistakes to Avoid
Nailing down curled or cupped shakes – Forcing stressed wood flat causes it to crack or split, opening new water entry points. Replace badly curled shakes; don't try to flatten them.
Sealing the entire roof surface – Cedar must breathe to shed moisture naturally. CSSB explicitly warns against sealants, waterproofers, and plasticizers—they trap moisture inside the wood and accelerate rot. Any topical product should be a water repellent and UV inhibitor, not a film-forming sealant.
Reattaching damaged shakes – A cracked or storm-loosened shake re-nailed in place won't hold against wind or ice. Replace it outright.
Walking on an aged roof without assessing it first – On roofs older than 15–20 years, shakes may be visibly gray and fragile. If the wood looks dusty and fiber-thin, or the roof feels spongy underfoot, don't proceed. Walking the roof will cause more damage than the leak itself.
Repair vs. Replace: How to Decide
Repeated patch repairs on a deteriorating roof often cost more than a single timely replacement. These four scenarios can help you decide:
| Scenario | Recommended Action |
|---|---|
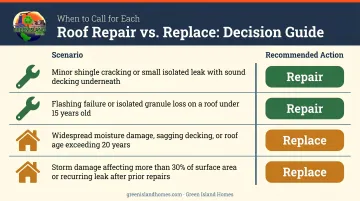
| Isolated damage, roof under 15 years old, firm shakes | Repair – Replace damaged shakes, patch underlayment, reseal flashing |
| Multiple leaks in different areas, widespread cracking or soft shakes | Replace – The roof system has failed; patches won't prevent new leaks nearby |
| Roof is 20+ years old with recurring leaks despite past repairs | Replace – CSSB puts average cedar roof lifespan at 30–40 years, but coastal environments, salt air, and poor maintenance shorten that window |
| Leak traced to flashing failure only, shakes in good condition | Repair – Targeted flashing replacement, no full re-roof needed |
If you're in that third scenario—recurring leaks on an aging Cape Cod or Martha's Vineyard cedar roof—Green Island Homes provides licensed residential roofing services across both areas and can assess whether repair or full replacement is the right call. Contact them at 774-563-9714 or sales@greenislandhomes.com.
Preventive Maintenance to Extend Your Cedar Roof's Life
Annual Inspection and Debris Management
Inspect the roof every spring and after major storms. Binoculars from the ground are often enough to spot missing shakes, dark streaking, or lifted flashing. Catching one damaged shake early prevents a multi-shake repair later.
Simple upkeep goes a long way:
- Clear gutters at least twice a year to prevent overflow and pooling at the eaves
- Sweep debris off the roof surface annually — accumulated leaves and pine needles trap moisture against cedar, accelerating rot from the surface down
- Skip the pressure washer. Both CSSB and OSU Extension caution that high-pressure washing can fracture shakes and force water beneath them
Moss Control
Installing zinc or copper strips along the ridge cap is the most passive moss deterrent available. When it rains, water reacts with the metal and carries a mild inhibiting solution down the roof surface. OSU Extension notes that larger roofs may need multiple strips since metal concentration dilutes as it travels further down the slope.
Attic Ventilation
Adequate ventilation is the single biggest factor in extending cedar roof life. CSSB states that proper airflow prevents moisture from condensing on the underside of shakes and on the roof deck — the slow rot that goes undetected until leaks are already serious.
Keep soffit vents, ridge vents, and louvers clear year-round. The 2021 IRC sets a minimum net free ventilating area of 1/150 of the vented space (R806.2) as the baseline standard.
Frequently Asked Questions
Can cedar shake roofs be repaired?
Yes—when damage is localized, individual cracked or missing shakes can be replaced and underlayment or flashing patched without touching the rest of the roof. If damage is widespread or the roof has passed its useful lifespan, full replacement is more cost-effective than continued patchwork.
Should you seal a cedar shake roof?
No. Cedar must breathe between rain events to dry out naturally—sealing traps moisture inside the wood and accelerates rot. If any topical treatment is applied, CSSB specifies it should be a water repellent and UV inhibitor, not a waterproofer or sealant.
How do I know if my cedar shake roof is leaking?
Look for water stains on interior ceilings, damp attic insulation, visible daylight through the roof deck, or exterior signs like dark patches and missing shakes. Because the interior drip point rarely aligns with the actual roof entry, trace the water trail in the attic to find the true source.
Can I use caulk to fix a cedar shake roof leak?
Caulk won't adhere properly to unfinished cedar and delivers only a temporary fix at best. It's appropriate for sealing small gaps on metal flashing or finished surfaces—not as a substitute for replacing damaged shakes.
How long do cedar shake roofs typically last?
CSSB puts the average lifespan at 30–40 years, though coastal environments like Cape Cod and Martha's Vineyard can shorten that without consistent maintenance. Using Type 316 stainless steel fasteners instead of standard galvanized hardware helps maximize longevity in salt-air conditions.
How do I prevent moss from growing on my cedar shake roof?
Keep gutters and the roof surface clear of organic debris, which holds the moisture moss needs to take hold. Installing zinc or copper strips along the ridge produces a mild runoff solution when it rains that inhibits moss growth across the courses below.