This guide is written for homeowners who are comfortable with basic carpentry tools and working on ladders, and who are willing to follow a methodical process. If your project involves multiple stories, complex roofline intersections, or a full re-side, the scope typically exceeds DIY territory — more on that later.
What goes wrong when steps are skipped: uneven courses that won't align at corners, water behind the boards from missed flashing, early rot at unsealed end grain, and finish failure that requires pulling boards off to fix. None of those are cheap.
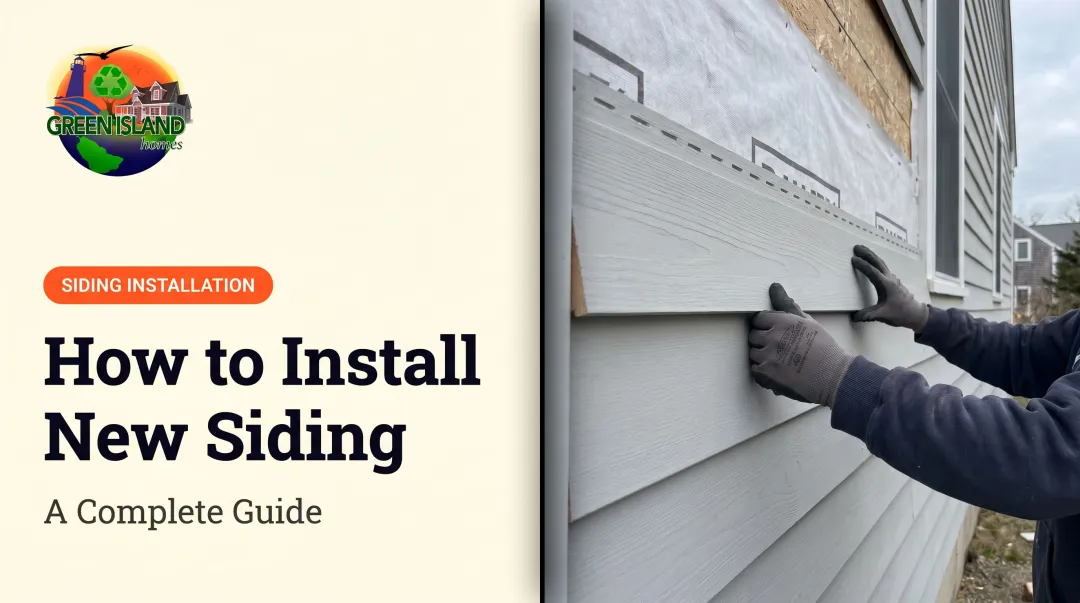
This guide covers the complete process — wall prep through final nailing — in the correct sequence.
Key Takeaways
- Complete wall prep (housewrap, flashing, rainscreen) before the first board goes up — skipping this voids most siding warranties
- Build a story pole to calculate exposure and keep courses aligned with windows
- Nail 1 inch above the butt edge, never through the overlapping board below
- Seal all six sides of every board — especially the end grain — before installation
- Install a wood starter strip at the base to project the first course outward at the correct angle
What You Need Before Starting: Prerequisites, Tools, and Materials
Before the first clapboard touches the wall, confirm all three of the following:
- Sheathing is complete and structurally sound
- Corner boards and window/door trim are installed and plumb
- Housewrap covers the entire wall surface with seams lapped correctly
Installing siding over a wet or unfinished wall is a hard stop — no exceptions.
Tools Required
- Tape measure and level
- Chalk line
- Circular saw or miter saw
- Hammer or pneumatic nail gun (nail gun is optional but speeds up larger runs)
- Utility knife and speed square
- Caulking gun and staple gun
- Story pole (a straight scrap board as tall as the wall — shop-built from a 1×3)
Materials Required
- Clapboard siding (measure all wall square footage, deduct windows and doors, add 10% for waste)
- 7d stainless steel or hot-dipped galvanized nails (stainless strongly preferred in coastal environments)
- Housewrap tape
- Metal drip cap flashing
- Rainscreen mesh or 1×3 furring strips
- Exterior-grade caulk
- Primer or solid stain for end sealing
- Corner boards (if not already installed)
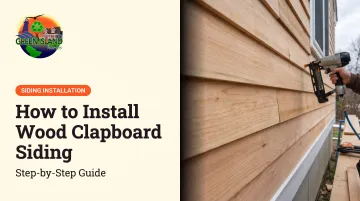
How to Install Wood Clapboard Siding Step-by-Step
This installation follows a strict sequence: prep, layout, starter strip, courses, detailing. Reversing or skipping any step almost always creates rework — and fixing mistakes after boards are nailed takes far longer than doing it right the first time.
Step 1: Prepare the Wall Surface and Install Flashing
DuPont's Tyvek installation guide specifies housewrap installed bottom-up, with each row overlapping the one below by at least 6 inches, vertical seams overlapping 6 to 12 inches, and all vertical seams taped. Horizontal seams are taped when the housewrap functions as an air barrier.
Once housewrap is confirmed:
- Install aluminum drip cap along the base of the wall, above the skirtboard or water table
- Overlap drip cap sections by at least 3 inches; tape the top edge to the housewrap
- Apply 12-inch strips of felt or housewrap tape behind corner board locations and around all window and door casings
Flashing must dump water outward and downward — never back behind the housewrap.
Step 2: Install a Rainscreen Layer
Building Science Corporation explains that wood siding is a reservoir cladding — it absorbs and releases moisture. All wood siding will eventually allow some moisture behind it. Without a drainage gap, that moisture accumulates against the sheathing and accelerates rot and finish failure.
Two practical options:
- Rainscreen mesh: Staple over the housewrap across the full wall surface
- Furring strips: Rip 1×3 boards and nail them vertically over stud lines
Either approach creates the air gap needed for moisture to drain and dry. In the humid, salt-air conditions of Cape Cod and Martha's Vineyard, this step is not optional — it's the difference between a 40-year installation and one that starts showing problems at year 8.
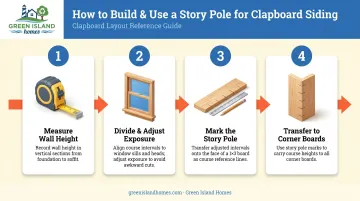
Step 3: Calculate Exposure and Build a Story Pole
"Exposure" is the visible face height of each course. For 6-inch clapboards, a 4.5-inch exposure with a 1.5-inch overlap is the standard; the minimum overlap is 1 inch regardless of board width. The goal is for course bottoms to land cleanly at window sills and heads, which means exposure must be calculated, not assumed.
Small errors accumulate fast: a 1/8-inch drift per row means a 1.5-inch misalignment by row 12 — enough to make window alignments visibly wrong.
How to build and use a story pole:
- Measure wall height in sections (base to window bottom, window bottom to window top, window top to eave)
- Divide each section by the nominal exposure and adjust slightly so course lines land at sill and head heights
- Mark these adjusted intervals on a straight 1×3 board — this is your story pole
- Transfer the marks to both corner boards using the pole; these marks are the reference for every course across the wall
Step 4: Install the Starter Strip
Without a starter strip, the first full course lies flat against the wall instead of projecting at the same angle as every course above it — creating a visible dip at the base.
To install the starter strip:
- Rip approximately 1 to 1.5 inches from the thin (top) edge of a clapboard
- Nail the strip at the base of the wall with its thick edge facing out
- Position the thick edge about 1/8 inch above the drip cap — that gap lets moisture drain and keeps the board out of standing water
Step 5: Nail the Clapboard Courses
Align the butt edge of the first full clapboard with the bottom of the starter strip. Check for level. Then:
- Nail into each stud approximately 1 inch above the butt edge — high enough to clear the top of the board below without nailing through it
- Never nail through two overlapping boards. Pinning the lower board prevents natural seasonal expansion and leads to splitting
- Use story pole marks on corner boards to align each course; snap chalk lines for runs longer than 8 feet
- For field joints mid-wall, cut a 45-degree scarf joint over a stud, seal both cut ends before fitting, and drive one nail through the overlapping board close to the joint
- Pre-drill within 2 inches of any board end to prevent splitting
The WRCLA installation guide specifies one nail per piece, maximum 24 inches on center, with nails penetrating solid wood at least 1-1/4 inches.
Step 6: Work Around Windows, Doors, and Corners
At windows and doors:
- Notch clapboards to fit around sills or beneath casings; seal all cut surfaces before installing
- Install a metal drip cap above every window and door head casing before running the course above it
At corners:
- Butt clapboard ends against the corner board with a 1/16-inch gap filled with caulk
- Never force boards tight to the corner board — seasonal wood movement will cause buckling
At field seams:
- Apply caulk to end grain and slip flashing behind the first piece before butting the second piece against it
Post-Installation Checks
Before painting or staining, run through this checklist. Catching problems now — while boards are still accessible and unfinished — is far easier than diagnosing water damage or nail failures after the finish coat goes on.
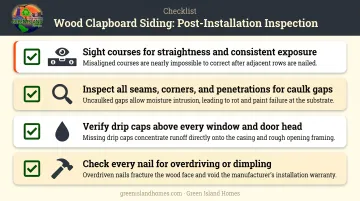
- Sight down each course from both ends of the wall — rows should be straight, exposure consistent. Boards bowing in or out indicate a nailing error or missing starter strip effect
- Inspect all seams, corners, and penetrations — caulk must be tooled smooth with no gaps, and no board end should be left unsealed
- Verify drip caps are installed above every window and door head; missing drip caps are one of the most common moisture entry points in clapboard installations
- Check every nail — overdriven nails dimple into the wood face, lose holding power, and open a direct path for water entry. Any nail driven too deep should be pulled and reset at the correct depth
Common Installation Problems and How to Fix Them
Wavy or Uneven Courses
Problem: Boards rise or dip across the wall; course lines don't match at corners or around windows.
Cause: Story pole not used consistently, or layout marks transferred incorrectly to corner boards. Even small transfer errors compound over a long run.
Fix: Re-snap chalk lines from the story pole marks and use these as the top-edge reference for each remaining course. If boards are already nailed, carefully remove affected courses and re-lay from the last confirmed level course downward.
Boards Splitting Near the Ends
Problem: Clapboards crack at nail locations, especially near board ends or at joints.
Cause: Nailing too close to the end without pre-drilling, or using nails with too large a diameter for dry or finger-jointed boards.
Fix: Pre-drill within 2 inches of any board end using a bit slightly smaller than the nail shank. Ease up on driving force near ends, and make sure the nail is entering straight — angled fasteners split end grain faster than anything else.
Water Infiltration at Butt Joints or Seams
Problem: Staining, paint bubbling, or visible moisture at mid-wall joints or where boards meet trim.
Cause: Field joints not scarfed at 45 degrees, end grain not sealed before installation, or no flashing behind the seam.
Fix: Remove affected boards, inspect and repair housewrap with tape, install Z-flashing or aluminum flashing behind the joint, seal all end grain, and re-cut as a proper 45-degree scarf over a stud.
Pro Tips for Installing Clapboard Siding Effectively
Acclimate and prime before installing. Allow boards to acclimate outdoors for one to two weeks — stickered off the ground with airflow on all sides. According to the WRCLA guide, kiln-dried siding needs 3 to 5 days; green siding needs at least 30. Before installation, apply primer or solid stain to all six sides of every board — both faces, both edges, and both ends. End grain absorbs moisture up to 250 times faster than other wood surfaces and is the primary entry point for rot.
Coastal environments require upgraded specs. On Cape Cod and Martha's Vineyard, standard specs aren't enough. Salt air and moisture demand:
- Type 304 or 316 stainless steel nails rather than standard galvanized, which corrode and lose holding power within a few years
- 18-inch minimum clearance between the bottom course and grade to prevent splash-back
- Stone veneer or alternative cladding for lower sections where clearance is limited
Know when to call a professional. Multi-story installations, complex roofline intersections, or full-house re-siding projects involve staging, flashing coordination, and sequencing that go beyond typical DIY scope.
If you're planning a significant siding project on Cape Cod or Martha's Vineyard, working with a fully licensed and insured contractor like Green Island Homes means the job gets done correctly the first time. Hidden flashing and drainage details can't be fixed once the boards go up.
Conclusion
Every step in a clapboard installation — housewrap laps, flashing, rainscreen, story pole layout, correct nailing height, sealed end grain — directly affects how long the siding performs. The visible work is the boards themselves, but the durable work is mostly behind them.
Careful preparation before the first board goes up, disciplined execution throughout, and a thorough post-installation check before finishing will produce a result that outlasts a rushed job by decades. If at any point the scope expands beyond what you can manage safely and accurately, bringing in a professional is the right move. There's no shame in knowing where the job ends and the expertise begins.
Frequently Asked Questions
What goes under clapboard siding?
The wall assembly should include structural sheathing, a housewrap or building paper moisture barrier with taped seams lapped bottom-over-top, metal flashing at the base and around all openings, and ideally a rainscreen or furring strip layer. That air gap lets moisture drain and dry rather than accumulate behind the wood.
How much overlap on clapboard siding?
The minimum overlap between courses is 1 inch. For 6-inch clapboards, a 4.5-inch exposure with a 1.5-inch lap is the standard. The exact exposure can be adjusted slightly so course bottoms align cleanly with window sills and heads.
Do I need to prime or seal clapboard siding before installation?
Yes — all six sides of every board, including both ends, should be primed or coated before installation. End grain is the most vulnerable surface; it absorbs moisture fastest and will rot from the cut edges inward if left unsealed, no matter how well the face finish holds up.
What type of nails should I use for clapboard siding?
Use 7d hot-dipped galvanized or stainless steel nails as a baseline. Stainless steel (Type 304 or 316) is strongly preferred in coastal or humid climates. Standard galvanized coatings corrode in salt air, leaving rust streaks on the siding face and eventually losing holding power.
Can I install wood clapboard siding over existing siding?
Generally not recommended. Installing over existing siding traps moisture, adds weight to the wall assembly, and makes it impossible to inspect or repair the housewrap and flashing underneath. Removing old siding first is the better practice in nearly every case.