For homes on Cape Cod and Martha's Vineyard, the margin for error is smaller than most. Salt air accelerates corrosion on low-grade metal flashing. High winds exploit any shingle that wasn't nailed in the correct zone. A single blocked soffit vent in a coastal climate can create enough attic moisture to start rotting structural wood within a season.
This checklist gives you a systematic, phase-by-phase process to verify that your new roof was installed correctly — before you sign off, and before the first storm rolls in.
Key Takeaways
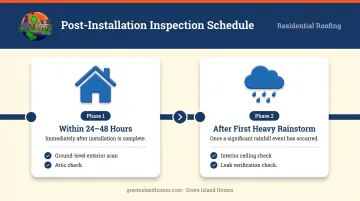
- Do a ground-level exterior scan and attic check within 24–48 hours of the crew leaving
- Verify the leak check after the first significant rainstorm, not a light drizzle
- Check exterior for: shingle alignment, flashing at penetrations, drip edge, gutter condition, and full debris cleanup
- Check interior for: daylight gaps, shiners, decking condition, ridge vent gap, and clear soffit vents
- Secure both warranties — manufacturer material and contractor workmanship — before making final payment
Before You Begin: Tools, Timing, and Safety
When to Inspect
Post-installation inspection isn't a single event. It happens in two phases:
- Within 24–48 hours of crew departure — ground-level exterior scan and attic check while everything is fresh and visible
- After the first heavy rainstorm — interior ceiling and leak verification check
On Cape Cod and Martha's Vineyard, don't wait longer than a week for the exterior and attic inspection. Salt air and coastal humidity accelerate moisture intrusion through even small undetected gaps.
What You'll Need
- Binoculars — for shingle detail from the ground without climbing
- Flashlight — for the attic inspection
- Magnetic nail sweeper — if the contractor didn't visibly perform one
- Phone or notepad — to photograph and document everything with timestamps
- Contractor's scope of work — to cross-reference what was agreed upon versus what was actually completed
A Note on Safety
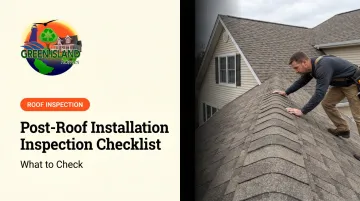
Don't climb the roof yourself. Roof surfaces are particularly unstable immediately after installation — fresh sealants and shifted materials make footing unpredictable. Leave any elevated inspection to a licensed professional.
The Exterior Inspection Checklist
Walk the full perimeter of the home from multiple angles before zeroing in on specific components. The exterior is where most installation errors become visible first.
Shingle Alignment, Overhang, and Nailing
Correct shingles lie flat, run in even horizontal courses, and maintain consistent spacing. Per GAF installation instructions, shingles should overhang the eave and rake edges by 1/4 to 3/4 inch — a range also supported by NRCA's Professional Roofing guidelines. Too little overhang lets water wick into the fascia; too much creates wind vulnerability and sag.
Watch for these warning signs from the ground:
- Shingles that appear to sit slightly higher than their neighbors (possible nail placement outside the manufacturer's designated nailing zone)
- Visible buckling, curling, or gaps between courses
- Uneven horizontal lines across the roof face
GAF's warranty documentation excludes damage from improper application — including nails placed outside the designated nailing area. What looks like a minor alignment issue from the driveway can have real warranty consequences.
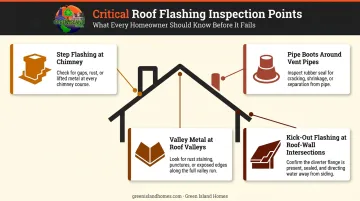
Flashing at Chimneys, Vents, Skylights, and Valleys
Flashing is the most common point of failure on any roof. A full replacement should include all-new metal flashing. GAF's technical guidance states that reusing existing flashing is not recommended — it's permitted only when the material is in like-new condition with no corrosion, rust, or tearing.
Any plastic flashing must always be replaced with non-corroding metal. No exceptions.
Check each of the following:
- Step flashing along chimneys: tucked under shingles with no visible gaps
- Pipe boots around vent pipes — rubber and metal collar should sit flush with no separation
- Valley metal: free of debris, properly overlapped at seams
- Kick-out flashing where a roof edge meets a vertical wall — a piece many crews skip, which traps water behind siding
For coastal Cape Cod and Martha's Vineyard homes specifically: FEMA's coastal construction guidance flags rapid corrosion risk near the coast and supports corrosion-resistant material selection. Aluminum or galvanized steel is appropriate; low-grade metal won't hold up against salt air.
Drip Edge and Gutters
Drip edge is an L-shaped metal strip along roof eaves that directs water into the gutter rather than behind the roofing felt. IRC Section R905.2.8.5 requires it at eaves and rakes on asphalt shingle roofs — a standard NRCA also supports.
Check that a continuous metal strip runs along every eave. Its omission is a code violation, not just a best-practice gap.
For gutters, confirm:
- Firmly attached with no visible bending or misalignment from ladder placement during the job
- Downspouts directing water away from the foundation
- No leftover nails, shingle scraps, or excessive granule buildup inside the gutter that could block drainage
Debris and Nail Cleanup
Walk the full yard, driveway, flower beds, and any area below the eave line. Stray roofing nails are a serious hazard — capable of puncturing a tire or injuring a child or pet. If the contractor didn't visibly perform a magnetic sweep of the property, request one before releasing final payment. A crew that skips the sweep isn't done with the job yet.
The Interior Inspection: Attic, Ceilings, and Ventilation
The attic is where the most consequential installation problems hide. Spend 10 minutes with a flashlight and you'll cover more ground than any exterior scan.
The Daylight Test and Shiners
On a bright day, turn off all attic lights and look upward at the roof deck. Any pinpoints of light — other than through intentional vents — indicate gaps or holes that will eventually admit water.
While you're up there, scan the underside of the roof deck for shiners: nails that missed the rafter and protrude into open attic space. InterNACHI's attic inspection guidance identifies shiners as nails visible in the attic that missed framing members, and notes that rusty nails protruding through the deck indicate persistent moisture issues. Neither is acceptable on a new installation.
Decking Health
During a tear-off, any rotted or soft decking boards should be replaced before the new roof goes on. In the attic, look at the underside of the roof deck for:
- Dark water staining on wood
- Soft or spongy-looking sections
- Any visible mold or discoloration
These are signs that damaged decking may have been shingled over rather than replaced — a shortcut that undermines the entire installation.
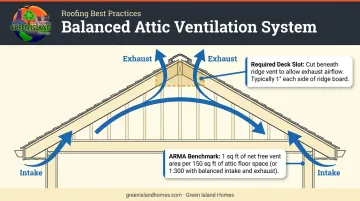
Ventilation Balance
A properly functioning roof requires both intake airflow (soffit vents at the eaves) and exhaust airflow (ridge vents or fans at the peak). ARMA's ventilation guidance offers a quick benchmark: divide attic floor square footage by 2 to get the square inches of net free area each side — intake and exhaust — should provide.
Two things to check directly:
- Ridge vent opening — GAF's Cobra ridge vent installation instructions require an actual slot cut in the roof deck beneath the vent. A ridge vent installed over uncut decking is non-functional.
- Soffit vents — confirm they're not blocked by roofing debris or displaced insulation from the tear-off
This matters more than most homeowners realize on Cape Cod and Martha's Vineyard. Poor attic ventilation lets humid, salt-heavy ocean air accumulate in the attic space — and GAF's own installation documentation lists inadequate ventilation as a direct cause of moisture buildup and mold. It's also a warranty exclusion, meaning a contractor's ventilation shortcut can void your coverage entirely.
Interior Ceiling Check
In the weeks following installation, check ceilings and upper walls throughout the home for:
- New water stains or discoloration
- Peeling paint or bubbling drywall
- Musty odors, particularly in upper-floor rooms
These signs don't always appear immediately. Conduct this check after the first true storm event — a sustained heavy rain — not just after a light shower following installation. Document any new stains with dated photographs in case a workmanship warranty claim becomes necessary.
How to Interpret Your Findings
Not everything you notice requires a callback. Knowing the difference between normal post-installation observations and genuine red flags saves time and avoids unnecessary disputes.
What's Normal
- Granule shedding in gutters during the first few rains — GAF's technical bulletin on granule loss confirms that loose excess granules from manufacturing wash away early.
- Shingles not fully lying flat in cool weather — they typically seal within 48–72 hours in warm conditions, and several weeks in winter.
Minor Issues for Contractor Follow-Up
- Small gap in caulking around a single vent pipe
- One or two misaligned shingles along a single course
- Gutter section left uncleaned after the job
These are correctable quickly, and most workmanship warranties cover them. Send a written note (email) and request a return visit.
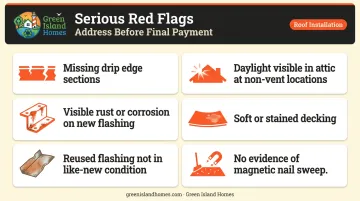
Serious Red Flags
Not all problems fall into the "minor fix" category. Address the following in writing before releasing final payment:
- Missing drip edge sections along any eave
- Visible rust or corrosion on flashing described as new
- Reused flashing that doesn't qualify as like-new
- Daylight visible in the attic at non-vent locations
- Soft, stained, or visibly damaged decking
- No evidence of a magnetic nail sweep
If your original contractor is slow to respond, document every communication in writing and reference the specific workmanship warranty terms. When needed, a licensed third party can assess the work and complete any required corrections.
Green Island Homes — serving Cape Cod and Martha's Vineyard — offers professional post-installation assessments and written findings reports for homeowners who want an independent evaluation of their new roof.
Common Post-Installation Inspection Mistakes to Avoid
Even well-intentioned homeowners miss things. These are the most frequent errors:
- Inspecting only from the driveway — a roof can look fine at street level while hiding flashing gaps and attic problems
- Signing off before the attic check — the exterior and the attic are separate inspections; one doesn't substitute for the other
- Assuming new metal means correct installation — new flashing can still be improperly installed, missing kick-out pieces, or made of material unsuitable for coastal conditions
- Not reading both warranty documents — the manufacturer's material warranty and the contractor's workmanship warranty cover different things, carry separate exclusions, and may have different registration requirements. Review both before filing them away
Don't conclude the roof is fine just because no interior stains appear in the first dry week. Many flashing gaps and ventilation failures only reveal themselves under sustained heavy rain. Wait for the first real storm before completing the interior ceiling assessment.
Frequently Asked Questions
What should I look for after a new roof is installed?
Check shingle alignment and correct overhang, flashing integrity at chimneys, vents, skylights, and valleys, drip edge presence along every eave, gutter condition and drainage, attic ventilation balance, a completed nail and debris cleanup, and both manufacturer and workmanship warranty documents.
How soon after roof installation should I do an inspection?
The ground-level exterior scan and attic check should happen within 24–48 hours of the crew leaving, while observations are fresh and any issues are easy to document. The leak verification check should follow the first significant rainstorm. A light drizzle won't stress-test flashing and valley metal the way a real storm will.
Is it normal to have shingle granules in the gutters after a new roof?
Yes — manufacturers apply excess granules during production, and the loose ones wash away in the first few rains. This is confirmed as expected in GAF's technical documentation. Heavy or ongoing granule loss after several months, however, is a different matter and calls for a warranty claim or contractor review.
What does improper flashing look like on a new roof?
Look for visible gaps between flashing and chimney or vent surfaces, sealant applied messily in thick beads (often covering a poor metal fit), any visible rust on supposedly new material, or old flashing that clearly wasn't replaced. All of these indicate workmanship concerns.
How do I know if my new roof has proper attic ventilation?
Check for an actual gap cut in the deck beneath the ridge vent, unobstructed soffit vents along the eaves, and airflow that feels balanced. If the attic feels excessively hot or smells musty shortly after installation, contact your contractor to verify the ventilation was set up correctly.
Should I get a third-party inspection after a new roof is installed?
A third-party inspection is especially valuable when working with a contractor for the first time, when the installation timeline felt rushed, or when concerns aren't being addressed promptly. A licensed professional can document findings in writing and help enforce workmanship warranty coverage.